Fuel accumulator - removal and refitting
Note: Refer to the precautions at the end of Section 1 before proceeding.
Pre-1986 models
Removal
1 The fuel accumulator is mounted adjacent
to the fuel pump, above the rear left-hand
suspension arm.
2 Disconnect the battery negative lead.
3 Raise the rear of the car and support it on axle-stands (see “Jacking and Vehicle Support”).
4 Relieve the system pressure by slowly loosening the fuel feed pipe at the warm-up regulator. Absorb fuel leakage in a cloth.
5 Disconnect the fuel pipes from the fuel accumulator and catch the small quantity of fuel which will be released (see illustration).
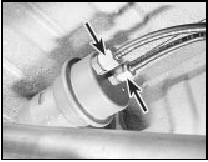
7.5 Fuel pipe connections (arrowed) at the underbody mounted fuel accumulator
6 Remove the clamp screw and remove the accumulator.
Refitting
7 Refitting is a reversal of removal. Check for
leaks on completion (with the engine
restarted).
1986 models onwards
Removal
8 On later models with K-Jetronic and KEJetronic
systems the fuel accumulator is
located in the engine compartment behind the
fuel distributor.
9 Disconnect the battery negative lead.
10 For access remove the air cleaner as described in Section 2.
11 Relieve the system pressure by slowly loosening the cold start valve union on the top of the fuel distributor (see illustration 6.4).
Absorb fuel leakage in a cloth.
12 Disconnect the fuel pipes from the accumulator and catch the small quantity of fuel which will be released (see illustration).
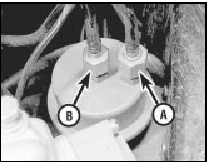
7.12 Fuel inlet pipe (A) and outlet pipe (B) at the engine compartment
mounted fuel accumulator
13 Remove the clamp screw and remove the accumulator.
Refitting
14 Refitting is a reversal of removal. Check
for leaks on completion (with the engine
restarted).
See also:
Handbrake cables - renewal
1 Chock the front wheels, then fully release
the handbrake.
2 Raise and support the vehicle at the rear
with axle stands (see “Jacking and Vehicle
Support”).
Primary cable
3 Extract the spring c ...
Seat belts - removal and refitting
Front seat belt stalk
1 Remove the front seat.
2 Detach the seat belt stalk from the seat by
removing the two Torx screws.
3 Refitting is a reversal of removal.
Front seat belt assembly
4 Where ...
Starter motor - testing in the car
Note: Refer to the precautions given in
“Safety first!” and in Section 1 of this Chapter
before proceeding.
1 If the starter motor fails to operate when the
ignition key is turned to the appropria ...
