
Thermo-time switch - removal and refitting
Removal
1 Disconnect the battery negative lead.
2 Drain the cooling system as described in Chapter 1.
3 Raise the front of the car and support it on axle stands (see “Jacking and Vehicle Support”).
4 Disconnect the wiring multi-plug from the thermo-time switch located on the inlet manifold intermediate flange and accessible from under the car (see illustration).
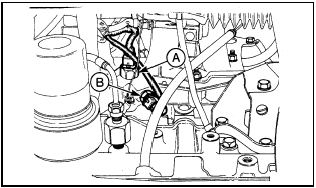
18.4 Thermo-time switch (A) and temperature sensor (B) on the KE-Jetronic
system (viewed from under the car)
5 Unscrew the unit and remove it from its location.
Refitting
6 Refitting is a reversal of removal. Refill the
cooling system as described in Chapter 1.
See also:
Rear roadspring (Van models) - removal and refitting
Removal
1 To remove the single leaf type rear
roadspring from the Van, raise the rear of the
vehicle and support it securely under the body
members (see “Jacking and Vehicle Support”).
Support th ...
Hydraulic system - bleeding (anti-lock braking system)
Note: Before starting work, refer to the
warning at the beginning of Section 11
concerning the dangers of hydraulic fluid.
1 On cars equipped with the anti-lock braking
system there are two bleed ...
Braking system
General information and precautions
General information
The braking system is of the dual circuit
hydraulic type. The front and rear circuits are
operated independently from a tandem
master cylin ...
