Handbrake - adjustment
1 Adjustment of the handbrake is normally automatic by means of the self-adjusting mechanism working on the rear brake shoes.
2 However, due to cable stretch, occasional inspection of the handbrake adjusters is recommended. Adjustment must be carried out if the movement of the control lever becomes excessive.
3 Chock the front wheels. Release the handbrake.
4 Raise and support the vehicle at the rear with safety stands (see “Jacking and Vehicle Support”).
5 Grip each adjustment plunger, one located on each rear brake backplate, and move it in and out (see illustration).
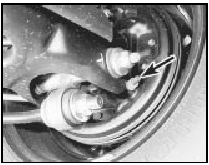
8.5 Handbrake adjustment plunger location (arrowed) on backplate
6 If the total movement of both plungers added together is between 0.5 and 2.0 mm (0.02 and 0.08 in) then adjustment of the handbrake is satisfactory. If the plunger movement is not as specified proceed as follows.
7 Two cable types are used on Escort models according to year of manufacture and it is necessary to identify the type being worked on before proceeding.
8 Locate the cable adjuster which is located just forward of the fuel tank. If the cable adjuster nut has finger grips but the abutment sleeve is smooth, proceed as follows. If both the cable adjuster and abutment sleeve have finger grips, proceed to paragraph 14 (see illustration).
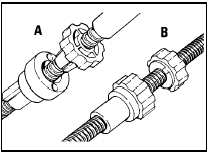
8.8 Handbrake cable identification
A Early cable with smooth abutment sleeve B Later cable with finger grip abutment sleeve
Early type cable with smooth
abutment sleeve
9 Make sure that the abutment sleeve on the
cable is fully engaged in its bracket slot.
Unlock the adjusting nut by levering between the shoulders of the nut and the sleeve.
10 Now turn the adjuster nut to eliminate slackness from the cable so that it is just possible to rotate the adjustment plungers on the brake backplates.
11 Apply the handbrake fully to seat the adjusting nut against its sleeve.
12 If adjustment of the cable does not alter the plunger movement then the handbrake cable is likely to be binding or seized or the brake mechanism is at fault.
13 On completion lower the car to the ground.
Later type cable with finger grip
abutment sleeve
14 If the cable adjuster and abutment sleeve
both have finger grips check to see if a nylon
locking pin is used to lock the adjusting nut in
position (see illustration). If so remove the
locking pin using pliers. Note that a new pin
will be needed after adjustment.
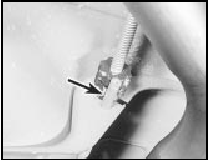
8.14 Handbrake cable adjuster nylon locking pin (arrowed)
15 Slacken the adjusting nut then apply the footbrake hard several times to ensure full self-adjustment of the brake shoes.
16 Turn the abutment sleeve as necessary until the total movement of both adjustment plungers added together is between 0.5 and 2.0 mm (0.02 and 0.08 in).
17 Tighten the adjusting nut against the abutment sleeve as tight as possible by hand (2 clicks) then tighten it by a further 2 clicks (maximum) using a suitable wrench.
18 Where applicable fit a new locking pin and tap it into place.
19 On completion lower the car to the ground.
See also:
Air cleaner element renewal (Every 24 000 miles (40 000 km) or 2 years)
Carburettor models
1 Remove the screws from the top of the air
cleaner cover (see illustration).
38.1 Remove the air cleaner cover screws . . .
2 Where applicable release the spring clips
aroun ...
Handbrake lever - removal and refitting
Removal
1 Chock the front wheels, raise and support
the vehicle at the rear using stands (see
“Jacking and Vehicle Support”) then release
the handbrake.
2 Working underneath, extract the spring c ...
Engine/transmission - removal and separation
Note: Suitable lifting tackle will be required for
this operation.
Carburettor engines
Removal
1 The engine is removed complete with the
transmission in a downward direction and then
withdrawn f ...
