Rear anti-roll bar (Saloon and Estate models) - removal and refitting
Removal
1 Slacken the left-hand roadwheel bolts, raise
and support the rear of the car on stands (see
“Jacking and Vehicle Support”). Remove the
roadwheel.
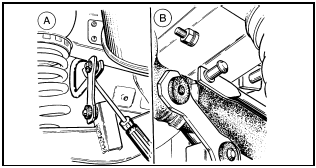
2 Lever the shackles from the right and lefthand suspension lower arms (see illustration).

18.2 Disconnecting the rear anti-roll bar shackles - Saloon and Estate models
A Left-hand side B Right-hand side
3 Unbolt the anti-roll bar from the underbody, carefully noting the relative fixing locations.
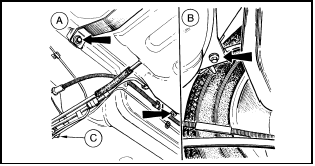
4 Release the fuel lines from their securing clips. Support the fuel tank and remove the three tank mounting bolts. Carefully lower the tank on its support (see illustration).

18.4 Fuel tank attachment details
A Mounting bolts (arrowed) B Mounting bolt (arrowed) C Fuel line clips
5 Withdraw the anti-roll bar from the left-hand side of the vehicle.
6 To remove the rubber bushes from the antiroll bar simply prise open the bush retainers with a screwdriver. Press the retainers together so that the fixing holes are in line when refitting.
Refitting
7 Refitting is a reversal of removal. The fuel
tank must be bolted in position before
securing the anti-roll bar. Ensure that the
underbody fixings are refitted in their original
locations.
8 Lubricate the shackle bushes with soap solution before reconnecting them to the lower arms.
See also:
Rear suspension leaf spring (P100 models) - removal and refitting
Note: All self-locking nuts and spring washers
must be renewed on reassembly.
Removal
1 Chock the front wheels, jack up the rear of
the vehicle and support on axle stands placed
under the side me ...
Rear anti-roll bar (Saloon, Hatchback and Estate models) - removal and
refitting
Removal
1 Loosen the rear roadwheel nuts, chock the
front wheels, jack up the rear of the vehicle
and support on axle stands placed under the
side members.
2 Prise off the straps which connect th ...
Pistons and connecting rods - examination and renovation
1 Examine the pistons for ovality, scoring,
and scratches. Check the connecting rods for
wear and damage. The connecting rods carry
a letter indicating their weight class; all the
rods fitted must ...
