Bumper components - removal and refitting
Bumper overriders
Removal
1 On pre-1986 models the overrider is held to
the bumper by a clamp screw. Find this screw
on the underside of the bumper and release it
- the overrider can then be withdrawn (see
illustration). If headlamp washers are fitted,
disconnect the fluid hose as the overrider is
withdrawn.
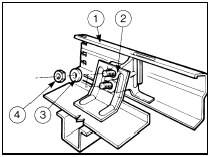
6.1 Bumper overrider details - pre-1986 models
A Without headlamp washer B With headlamp washer
2 On models from 1986 onwards the bumper assembly must be removed for access. Once this is done undo the two nuts (or single screw on XR3i models) and remove the overrider.
Refitting
3 In all cases refitting is a reversal of removal.
Bumper moulding (pre-1986
models)
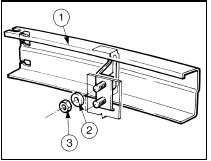
Removal
4 Where so equipped, remove the overriders
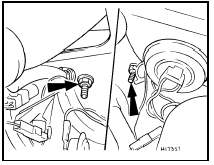
as described previously in this Section.
5 Release the moulding from the bumper by compressing the jaws of the retaining clips inside the bumper.
6 Slide the moulding from the end retainers, noting that the front bumper moulding is in two parts.
Refitting
7 To refit, push the moulding into position
and fully engage the clips.
Front bumper
Pre-1986 models
Removal
8 To remove the bumper complete, open the
bonnet and unscrew the bumper securing nuts
from each end of the bumper (see illustration).
6.8 Front bumper attachments - pre-1986 models
1 Bumper bar
2 Washer
3 Retaining nut
9 Withdraw the bumper from the vehicle.
10 Release the locking tangs using pliers, and pull or tap the quarter section free using a piece of soft wood to prevent damage. If required the quarter section end retaining clips can be removed from the body by twisting through 90° and pulling free.
Refitting
11 Reassembly and refitting are reversals of
removal and dismantling.
Models from 1986 onwards
Removal
12 Undo the single screw each side securing
the bumper to the edge of the wheel arch.
13 From under the wheel arch, undo the single bumper retaining nut on each side (see illustration). On models with wheel arch liners, to improve access to the securing nuts, if desired the wheel arch liners and/or the windscreen washer reservoir can be removed.
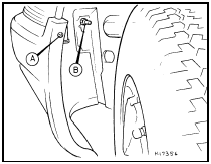
6.13 Front bumper-to-arch screw (A) and retaining nut (B) - 1986 models
onwards
14 From within the engine compartment undo the single nut each side securing the bumper to the front body panel (see illustration).
6.14 Front bumper retaining nuts in engine compartment - 1986 models onwards
15 Carefully withdraw the bumper from the front of the car.
Refitting
16 Refitting is the reversal of removal.
Rear bumper
Pre-1986 models except Van
Removal
17 To remove the bumper complete, open
the tailgate and unscrew the bumper securing
nuts from each end of the bumper (see
illustration).
6.17 Rear bumper attachments - pre-1986 models
1 Bumper bar
2 Mounting bracket
3 Washer
4 Fixing nut
18 Withdraw the bumper from the vehicle, and disconnect the number plate wiring plugs.
19 Release the locking tangs using pliers as shown, and pull or tap the quarter section free using a piece of soft wood to prevent damage (see illustration). If required the quarter section end retaining clips can be removed from the body by twisting through 90° and pulling free.
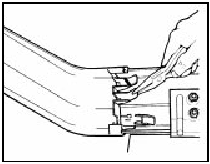
6.19 Removing rear quarter bumper retaining tangs - pre-1986 models
Refitting 20 Reassembly and refitting are reversals of removal and dismantling.
Models from 1986 onwards except
Van
Removal
21 Undo the three screws each side securing
the bumper to the edge of the wheel arch.
22 From inside the luggage compartment undo the two bumper retaining nuts each side (see illustration).
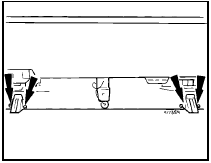
6.22 Rear bumper attachments in luggage compartment - 1986 models onwards
23 Disconnect the number plate lamp wiring, ease the sides of the bumper outward and withdraw it from the car.
Refitting
24 Refitting is a reversal of removal.
Van models
25 To remove either rear quarter bumper,
prise out the number plate lamp, disconnect
the bulbholder and extract the two Torx
screws. Refitting is a reversal of removal.
See also:
Interior lamp bulbs - renewal
1 Disconnect the battery negative lead.
Courtesy lamp
2 Remove the courtesy lamp.
3 Unclip the bulb from the lamp. On models
fitted with an overhead console and map
reading lamps, the courtesy la ...
Cigar lighter - removal and refitting
Removal
1 Disconnect the battery negative terminal.
2 On pre-1986 models remove the ashtray
then undo the screws and withdraw the
ashtray housing. On 1986 models onwards,
refer to Section 21 and ...
Interior trim panels - removal and refitting
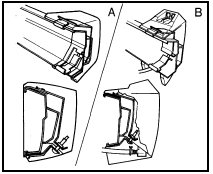
Rear quarter trim panel
Removal
1 Unbolt the seat belt from its floor mounting.
2 Pass the belt buckle slide through the panel
aperture.
3 Pull the seat cushion and backrest forward.
4 Extract t ...
