Bonnet - removal and refitting
Removal
1 Open the bonnet and support it on its stay.
2 Disconnect the screen washer pipe on the underside of the bonnet lid (see illustration).
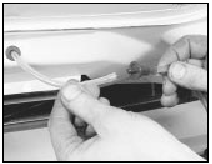
7.2 Disconnecting the windscreen washer fluid pipe
3 Where applicable, disconnect the earth lead from the bonnet.
4 Mark round the hinge plates on the underside of the bonnet lid as an aid to refitting.
5 With an assistant supporting one side of the bonnet lid, unbolt the hinges and lift the lid from the vehicle.
Refitting
6 Refit by reversing the removal operations. If
a new bonnet is being installed, position it so
that an equal gap is provided at each side
when it is being closed.
7 The bonnet should close smoothly and positively without excessive pressure. If it does not, carry out the following adjustment.
8 Screw in the bump stops which are located on the front upper cross rail (see illustration).
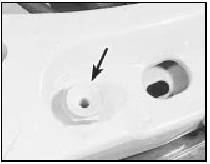
7.8 Bonnet bump stop (arrowed)
Close the bonnet and then readjust the bump stops until the bonnet is flush with the wing upper surfaces.
9 Adjust the striker centrally in relation to the latch. Release it by unscrewing its pressed steel locknut.
10 Screw the striker in or out until the bonnet fully closes under its own weight when allowed to drop from a point 300 mm (12 in) above its released position.
See also:
Exterior lamps - removal and refitting
Headlamp
Removal
1 On pre-1986 models, remove the radiator
grille as described in Chapter 11.
2 Working in the engine compartment,
disconnect the headlamp wiring multi-plug
and remove the sidela ...
Introduction
CALIFORNIA Proposition 65 Warning
WARNING: Engine exhaust, some of its constituents, and
certain vehicle components contain or emit chemicals known to
the State of California to cause cancer and bi ...
Fuel pump - cleaning
Note: Refer to the warning at the end of
Section 1 before proceeding.
1 On certain early models the fuel pump has
a detachable cover allowing access to the
internal filter for cleaning. If this ty ...
