Loudspeakers - removal and refitting
Facia mounted loudspeaker
Removal
1 Carefully prise up the speaker grille using a
small screwdriver. Lift it from the facia.
2 Extract the speaker mounting screws which are now exposed.
3 Lift the speaker up until the connecting wires can be disconnected by pulling on their terminals. The wires have different connecting terminals to prevent incorrect connection.
Refitting
4 Refitting is a reversal of removal.
Cowl panel-mounted loudspeaker
Pre-1986 models (except Cabriolet)
Removal
5 Prise out the grille retaining clip.
6 Extract screws as necessary to be able to remove the cowl panel/grille.
7 Extract the four speaker mounting screws and withdraw the speaker until the leads can be disconnected at the rear of the speaker (see illustration).
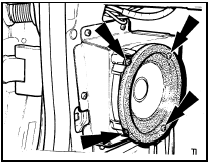
22.7 Cowl mounted loudspeaker retaining screw locations - pre-1986 models
Refitting 8 Refitting is a reversal of removal.
1986 models onwards (except
Cabriolet)
Removal
9 Extract sufficient screws from the scuff
plate to facilitate cowl panel removal.
10 Insert a screwdriver into the captive plastic retainers and turn 90° anti-clockwise to remove them. Withdraw the cowl panel (see illustration).
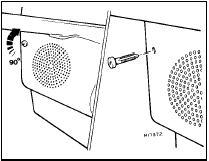
22.10 Cowl mounted loudspeaker panel retainer removal - 1986 models onwards
11 Undo the three speaker retaining screws, disconnect the leads and remove the speaker (see illustration).
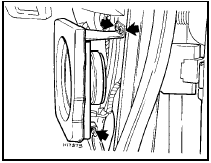
22.11 Cowl mounted loudspeaker retaining screw locations - 1986 models
onwards
Refitting 12 Refitting is a reversal of removal.
Cabriolet models
Removal
13 Extract the screws from the scuff plate.
14 Extract the end screw from the facia panel.
15 Prise the door weatherseal from the cowl panel.
16 Remove the cowl panel and, if required, unclip the speaker grille.
17 Extract the four speaker mounting screws and withdraw the speaker until the leads can be disconnected.
Refitting
18 Refitting is a reversal of removal.
Rear parcel shelf-mounted
loudspeaker
Removal
19 On pre-1986 models, prise the loudspeaker
cover free by inserting a screwdriver blade into
the slots on the side of the cover (see
illustration).
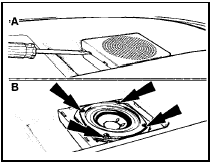
22.19 Rear parcel shelf-mounted loudspeaker removal - pre-1986 models
A Prising cover open B Retaining screw locations
20 On all models undo the four speaker retaining screws, pull the speaker away from the shelf and disconnect the wires.
Refitting
21 Refitting is a reversal of removal.
Rear parcel tray-mounted
loudspeaker
Removal
22 Unscrew the collar and pull the wiring
plug from the loudspeaker.
23 Remove the rear parcel tray. Unscrew the four retaining screws and remove the speaker.
Refitting
24 Refit in the reverse order to removal.
Rear quarter panel-mounted
loudspeaker - Cabriolet models
Removal
25 Fully open the roof and lock it.
26 Pull off the roof release lever knob and remove the window winder.
27 Pull back the rear quarter trim panel then remove the three screws and withdraw the trim panel with the speaker.
28 Disconnect the wiring then extract the screws and detach the speaker and grille from the panel. Note the location of the washers.
Refitting
29 Refitting is a reverse of removal. Position the
speaker so that the terminals face forwards.
See also:
Crankshaft and bearings - examination and renovation
1.8 litre (R2A type)
1 Examine the bearing surfaces of the
crankshaft for scratches or scoring and, using
a micrometer, check each journal and
crankpin for ovality. Where this is found to be
in e ...
Engine/automatic transmission assembly - reconnection and refitting
1 Reverse the procedure described in Section
11, noting the following points.
2 Check that the engine adapter plate is
correctly positioned on its locating dowels.
3 As the torque converter is onl ...
Air conditioner refridgerant charge check (Every 12 000 miles (20 000 km) or
12 months)
1 If applicable, remove the radiator grille
being careful not to damage the condenser
fins.
2 Check the refrigerant charge as follows.
The engine should be cold and the ambient
temperature should ...
