Camshafts and cam followers - removal, inspection and refitting
Note: Once the timing chain has been removed from the camshaft sprockets, do not turn the crankshaft until the timing chain has been correctly refitted - this is to prevent contact between the valves and pistons. A new timing chain tensioner plunger assembly, a new upper timing chain cover gasket, and a new camshaft cover gasket and reinforcing sleeve sealing rings, must be used on refitting.
Removal
1 If the engine is in the vehicle, carry out the
following operations:
a) Disconnect the battery negative lead.
b) On carburettor models, remove the air cleaner.
c) On fuel injection models, remove the air inlet hose, plenum chamber, and air cleaner lid as an assembly.
d) Disconnect the breather hose from the camshaft cover.
e) Remove the distributor cap and HT leads, and the rotor arm and housing. If necessary, mark the HT leads to aid refitting.
2 Proceed as described in paragraphs 2 to 15 inclusive of Section 18.
Inspection
3 Examine the surfaces of the camshaft
journals and lobes and the contact surfaces of
the cam followers for wear. If wear is
excessive considerable noise would have
been noticed from the top of the engine when
running, and new camshafts and followers
must be fitted. It is unlikely that this level of
wear will occur unless a considerable mileage
has been covered. Note that the cam
followers cannot be dismantled for renewal of
individual components.
4 Check the camshaft bearing surfaces in the cylinder head and the bearing caps for wear. If excessive wear is evident, the only course of action available is to renew the cylinder head and bearing caps.
5 Check the cam follower bores in the cylinder head for wear. If excessive wear is evident, the cylinder head must be renewed.
6 Check the cam follower oil grooves and the oil ports in the cylinder head for obstructions.
Refitting
7 Refit the cam followers and the camshafts
as described in paragraphs 27 to 55 of
Section 18.
8 If the engine is in the vehicle, reverse the operations given in paragraph 1.
Flywheel/driveplate - removal inspection and refitting
Note: New flywheel/driveplate securing bolts must be used on refitting.
1 Refer to Chapter 2, Part A, noting the following points.
2 If the engine is in the car, refer to Chapter 6 when removing and refitting the clutch.
3 There is no need to make alignment marks between the flywheel/driveplate and the end of the crankshaft, as the securing bolt holes are offset, so the flywheel/driveplate can only be fitted to the crankshaft in one position.
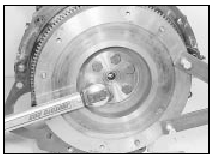
4 The flywheel/driveplate securing bolts must be renewed when refitting, and the new bolts are supplied ready-coated with threadlocking compound (see illustration).

22.4 Improvised tool used to hold flywheel when tightening securing bolts
5 Check on the availability of new parts before contemplating renewal of the ring gear.
See also:
Door trim panel - removal and refitting
Pre-1986 models
Removal
1 On Ghia versions only, remove the panel
capping by carefully prising out the retaining
clips using a forked tool. This can easily be
made from a piece of scrap metal.
2 ...
Emission control system
Your vehicle is equipped with various emission control components and a
catalytic converter which will enable your vehicle to comply with
applicable exhaust emission standards. To make sure that the ...
Oil pump - removal and refitting
Note: New oil pump and oil pick-up tube
gaskets should be used when refitting.
Removal
1 With the engine removed, proceed as
follows.
2 Remove the timing belt, crankshaft
sprocket and thrustwash ...
