Engine mountings - renewal
1 The engine mountings incorporate hydraulic dampers and must be renewed if excessive engine movement is evident.
2 Working in the engine compartment, unscrew the central nuts securing the engine mounting brackets to the tops of the mountings. Recover the washers.
3 Apply the handbrake, jack up the front of the vehicle and support on axle stands (see “Jacking and Vehicle Support”).
4 Working underneath the vehicle, remove the central nuts securing the mountings to the crossmember. Recover the washers.
5 Raise the engine using a suitable hoist and lifting tackle attached to the engine lifting brackets on the cylinder head, or a jack and interposed block of wood under the sump, until the mountings can be withdrawn.
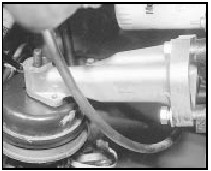
6 Fit the new mountings, then lower the engine onto them. Note that the locating pins on the mountings must engage with the corresponding holes in the engine mounting brackets (see illustration).

16.6 Locating pin on mounting must engage with hole (arrowed) in engine
mounting bracket
7 Fit the nuts and washers securing the mountings to the crossmember and tighten the nuts.
8 Lower the vehicle to the ground and fit the nuts and washers securing the engine mounting brackets to the mountings. Tighten the nuts.
See also:
Ignition system - testing
Note: Refer to the precautions given in
Section 1 before proceeding.
Contact breaker ignition system
1 By far the majority of breakdown and
running troubles are caused by faults in the
ignition s ...
Engine Coolant Temperature (ECT) sensor - removal and refitting
Removal
1 The sensor is screwed into the cylinder
block below the inlet manifold.
2 Disconnect the battery negative lead.
3 Drain the cooling system as described in
Chapter 1.
4 Disconnect the s ...
Instrument panel components - removal and refitting
1 Remove the instrument panel.
Panel illumination and warning
lamp bulbs
2 Twist the relevant bulbholder anticlockwise
and withdraw it from the printed
circuit board on the rear of the instrument ...
