Flywheel/driveplate - removal, inspection and refitting
Note: New flywheel securing bolts must be used on refitting.
1.8 litre (R2A type)
1 Refer to Section 26, Chapter 2, Part A but
also note the following points.
2 The flywheel/driveplate securing bolts must be renewed when refitting, and the new bolts are supplied ready-coated with threadlocking compound (see illustration).
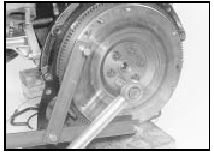
24.2 Using an improvised tool to hold the flywheel stationary while
tightening the securing bolts - 1.8 litre (R2A)
3 The ring gear cannot be renewed independently of the flywheel/driveplate. If the ring gear is badly worn or has missing teeth, a new flywheel/driveplate must be fitted.
1.6 and 1.8 litre (R6A type) 4 Refer to Section 26, Chapter 2, Part A, noting the following points.
5 If the engine is in the vehicle, refer to Chapter 6 when removing the clutch.
6 The flywheel securing bolts must be renewed when refitting, and the new bolts are supplied ready-coated with thread-locking compound.
7 The ring gear cannot be renewed independently of the flywheel. If the ring gear is badly worn or has missing teeth, a new flywheel must be fitted. Similarly, the flywheel must be renewed if the crankshaft speed/position sensor toothed disc is damaged.
See also:
Steering wheel - removal and refitting
Removal
1 Set the front wheels in the straight-ahead
position.
2 Prise the trim insert from the centre of the
steering wheel, and where applicable,
disconnect the horn electrical lead(s) (see
il ...
Switches - removal and refitting
General
1 Disconnect the battery negative terminal
before removing any switches.
Pre-1986 models
Wiper delay switch
2 Remove the switch knob and the bezel nut.
3 Withdraw the switch through the ...
Major operations possible with the engine in the car
The following work can be carried out
without having to remove the engine:
a) Cylinder head - removal and refitting.
b) Valve clearances - adjustment (see
Chapter 1).
c) Sump - removal and refitt ...
