Crankshaft and main bearings - removal and refitting
1.8 litre (R2A type)
Removal
1 With the engine removed from the vehicle,
remove the timing belt, crankshaft sprocket
and thrustwasher.
2 Remove the pistons and connecting rods. If no work is to be done on the pistons and connecting rods, there is no need to push the pistons out of the cylinder bores.
3 Remove the oil pump and pick-up tube.
4 Unscrew the four securing bolts and remove the crankshaft rear oil seal housing.
5 Check the main bearing caps for identification marks and if necessary use a centre-punch to identify them.
6 Before removing the crankshaft, check that the endfloat is within the specified limits by inserting a feeler blade between the centre crankshaft web and the thrust bearing shell (see illustration). This will indicate whether a new thrust bearing shell is required.
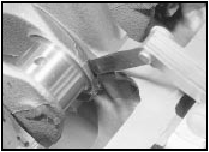
32.6 Checking crankshaft endfloat - 1.8 litre (R2A)
7 Unscrew the bolts and tap off the main bearing caps complete with bearing shells.
8 Lift the crankshaft from the crankcase.
9 Extract the bearing shells, keeping them identified for location.
Refitting
10 Commence refitting as follows.
11 Wipe the bearing shell locations in the crankcase with a soft, non-fluffy rag.
12 Wipe the crankshaft journals with a soft, non-fluffy rag.
13 If the old main bearing shells are to be renewed (not to do so is a false economy, unless they are virtually new) fit the five upper halves of the main bearing shells to their location in the crankcase. Note the flanged thrust bearing shell should be fitted to the centre bearing location (see illustrations).
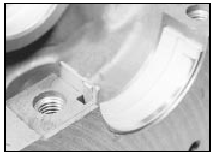
32.13a Rear main bearing shell in cylinder block - 1.8 litre (R2A)
32.13b Centre main thrust bearing shell in cylinder block - 1.8 litre (R2A)
14 Identify each main bearing cap and place in order. The number is cast on to the cap and an arrow is also marked which should point towards the front of the engine.
15 Wipe the cap bearing shell location with a soft non-fluffy rag.
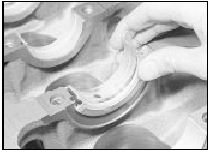
16 Fit the bearing half shell onto each main bearing cap.
17 Lubricate the crankshaft journals and the upper and lower main bearing shells with clean engine oil.
18 Carefully lower the crankshaft into the crankcase (see illustration).
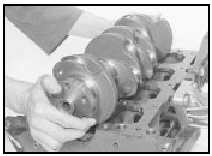
32.18 Lowering the crankshaft into the crankcase - 1.8 litre (R2A)
19 Lubricate the crankshaft main bearing journals again, then fit No 1 bearing cap. Fit the two securing bolts but do not tighten yet.
20 Fit the rear bearing cap, then the centre bearing cap, but as before do not tighten the bolts yet.
21 Fit the intermediate bearing caps and securing bolts, noting that the studded bolt which retains the oil strainer/pick-up tube fits on the inlet manifold side of No 4 bearing cap.
Again, do not tighten the bolts yet.
22 Check that the arrows on the bearing caps all point towards the front of the engine, and lightly tighten all the bearing cap bolts, then finally tighten the bolts in a progressive manner to the specified torque (see illustrations).
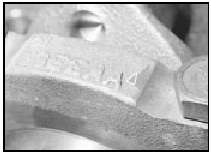
32.22a The arrows on the bearing caps must point towards the front of the
engine - 1.8 litre (R2A)
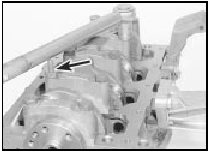
32.22b Tightening a main bearing cap bolt. Note studded bolt location
(arrowed) on No 4 bearing cap - 1.8 litre (R2A)
23 Check that the crankshaft rotates freely.
Some stiffness is to be expected with new components, but there must be no tight spots or binding.
24 Check that the crankshaft endfloat is within the specified limits by inserting a feeler blade between the centre crankshaft web and the thrust bearing cap.
25 Lubricate the oil seal lip with clean engine oil, then carefully fit the crankshaft rear oil seal housing. Using a straight-edge, ensure that the bottom face of the oil seal housing is aligned with the bottom face of the cylinder block before finally tightening the securing bolts (see illustration).
32.25 Fit the crankshaft rear oil seal housing and tighten the securing bolts
- 1.8 litre (R2A)
26 Carefully prise the crankshaft front oil seal from the oil pump housing, then refit the oil pump, oil strainer/pick-up tube and crankshaft front oil seal.
27 Refit the pistons and connecting rods.
28 Refit the thrustwasher, crankshaft sprocket and timing belt.
1.6 and 1.8 litre (R6A type)
29 Proceed as described above, noting the
following point:
On the 1.6 litre engine, note that
thrustwashers are used at the centre main
bearing (one each side of the bearing)
instead of a thrust bearing shell to control
crankshaft endfloat. Oversize
thrustwashers are available to
compensate for wear if necessary. The
thrustwashers should be fitted with the oil
grooves visible
See also:
Bulbs (interior lamps) - renewal
Pre-1986 models
Glove compartment lamp
1 This is simply a matter of gently pulling the
bulb from its holder.
Heater control illumination lamp
2 Slide the heater control levers to the top of
thei ...
Major operations requiring engine removal
The following work can only be carried out
after removal of the engine from the car:
a) Crankshaft main bearings - renewal .
b) Crankshaft - removal and refitting.
c) Flywheel - removal and refitt ...
Alternator - removal and refitting
Removal
1 Disconnect the battery leads.
2 Disconnect the multi-plug, or disconnect
the wires from their terminals on the rear of
the alternator, noting their locations (as
applicable), then slack ...
