Heater controls - removal and refitting
Removal
1 Disconnect the battery negative lead.
2 Remove the securing screws and unclip the lower and upper steering column shrouds.
3 Remove the four securing screws and withdraw the instrument panel surround. Note that the bottom right-hand screw is covered by a plastic panel which must be prised out.
4 Remove the passenger side lower facia panel.
5 Where necessary for improved access, detach the two vent hoses from the left-hand side of the heater, then detach the lower ends of the two control cables from the heater by removing the retaining screws (see illustration).
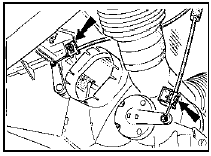
17.5 Heater control cable lower end fittings (arrowed)
6 Unscrew the three securing screws, and remove the heater control panel by sliding it through the facia panel and withdrawing it downwards. Disconnect the wiring from the control panel illumination bulb.
7 If necessary, the bulb can be removed with its holder.
Refitting
8 Refitting is a reversal of removal, bearing in
mind the following points.
9 When reconnecting the wiring to the control panel illumination bulb, wrap insulating tape around the wiring loom over a length of approximately 330.0 mm (13.0 in) starting from the bulbholder. Route the loom, ensuring that it is located in the two retaining clips, bend it over and secure it to the bulbholder with insulating tape as shown (see illustration). This procedure will prevent the wiring loom from chafing against the heater control levers.
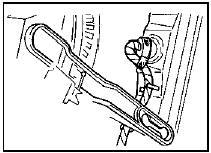
17.9 Heater control panel illumination bulb wiring loom correctly routed
10 When reconnecting the control cables to the heater, move the control levers on the control panel to the fully up position, then attach the cables to the clips on the heater.
The cable ends should project from the clips by between 0 and 4.0 mm (0 and 0.16 in). The cables are adjusted automatically by moving the control levers fully downwards. It is possible that considerable resistance may have to be overcome when moving the control levers.
See also:
General description
The independent front suspension is of the
MacPherson strut type, incorporating coil
springs and integral telescopic shock
absorbers. Lateral location of each strut
assembly is by a forged or pres ...
Cylinder head - removal and refitting (engine removed)
Note: Up to early 1984, splined type cylinder
head bolts were used, and from early 1984,
size T55 Torx bolts were used. Torx type bolts
must always be renewed after slackening. The
two types of bo ...
Engine/automatic transmission assembly - removal and separation
Note: A suitable hoist and lifting tackle will be
required for this operation. Any suspected
faults in the automatic transmission should be
referred to a Ford dealer or automatic
transmission spec ...
