Air cleaner - removal and refitting
Removal
1 On CVH models, disconnect the battery
negative lead.
2 Remove the screws from the top of the air cleaner cover (see illustration).
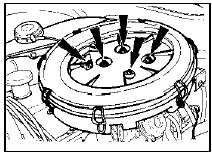
3.2 Air cleaner securing screws (arrowed)
3 Disconnect the cold air inlet hose from the air cleaner spout or the inlet on the front body panel. The hose is secured by toggle clips (see illustration).
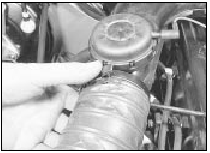
3.3 Disconnecting the cold air intake hose from the air cleaner spout
4 Disconnect the hot air inlet hose from the air cleaner spout or the hot air shroud on the exhaust manifold (see illustration).
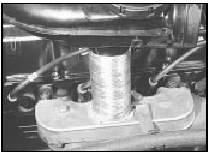
3.4 Hot air intake hose on hot air shroud
5 Disconnect the vacuum hose from the inlet manifold (see illustration).
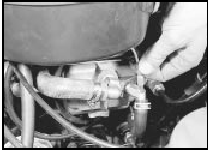
3.5 Disconnecting the air cleaner vacuum hose from the inlet manifold
6 On DOHC models, disconnect the camshaft cover breather hose 7 Where applicable, on OHC models remove the screw securing the air cleaner body to the camshaft cover.
8 Withdraw the air cleaner, and on CVH models, disconnect the wiring plug from the air charge temperature sensor mounted in the base of the air cleaner body, and disconnect the breather hose from the camshaft cover.
Refitting
9 Refitting is a reversal of removal, ensuring
that the disturbed hoses are securely
connected.
Air cleaner inlet air temperature control - testing
Refer to Chapter 1, Section 36.
See also:
Boot lid lock (Saloon models) - removal and refitting
Removal
1 With the boot lid raised, remove the lock
barrel retaining clip.
2 Where applicable, disconnect the operating
lever from the central locking solenoid/motor,
then withdraw the lock barre ...
Specifications
General
System type:
1.1 litre OHV engines . . . . . . . . . . . . . . . . . . . . . . . . . . . . .
. . . . . . . . Mechanical contact breaker and coil
1.1 litre CVH engines up to 1986 . . . . . ...
Door inner trim panel - removal and refitting
Front door
Models up to 1987
1 On models with manually-operated
windows, prise the cover from the window
regulator handle, note the position of the
handle with the window fully shut, then
remove ...
