Alternator brushes - removal, inspection and refitting
1 Remove the alternator.
Bosch type
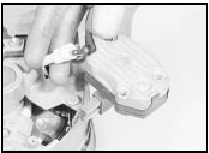
2 Remove the two securing screws and
withdraw the regulator/brush box assembly
from the rear of the alternator (see
illustration).
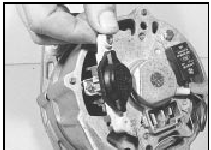
7.2 Withdrawing the regulator/brush box from a Bosch alternator
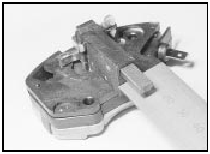
3 If the length of either brush is less than the minimum given in the Specifications, unsolder the wiring and remove the brushes and the springs (see illustration).
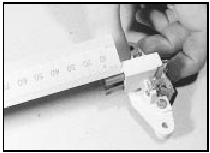
7.3 Compare the brush length with the figure in the Specifications - Bosch
alternator
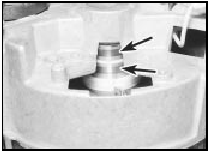
4 Wipe the slip rings clean with a fuelmoistened cloth. If the rings are very dirty use fine glasspaper to clean them, then wipe with the cloth (see illustration).
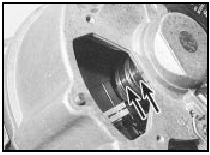
7.4 Inspect the condition of the slip rings (arrowed) - Bosch alternator
5 Refitting is a reversal of removal, but make sure that the brushes move freely in their holders.
Lucas A 115 and A 133 type 6 Disconnect the wiring plug, then remove the securing screw and withdraw the interference suppression capacitor from the rear cover.
7 Extract the two securing screws and remove the alternator rear cover.
8 Make a careful note of the fitted positions of the regulator wires, then disconnect the wires from the diode pack and the brush box.
9 Remove the regulator securing screws and withdraw the regulator. Note that the regulator securing screw also holds one of the brush mounting plates in position.
10 Remove the two securing screws and withdraw the brush box. Remove the securing screws and lift the brushes from the brush box.
11 If the length of either brush is less than the minimum given in the Specifications, renew both brushes.
12 Proceed as shown in paragraphs 4 and 5.
Lucas A 127 type
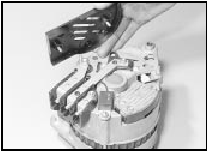
13 Where applicable, for improved access
remove the terminal cover from the rear of the
alternator, then remove the three screws
securing the regulator/brush box assembly to
the rear of the alternator (see illustration).
7.13 Removing the terminal cover from a Lucas A127 alternator.
14 Tip the outside edge of the assembly upwards, and withdraw it from its location.
Disconnect the wiring plug and withdraw the assembly from the alternator (see illustration).
7.14 Disconnect the wiring plug and withdraw the regulator/brushbox - Lucas
A127 alternator
15 If the length of either brush is less than the minimum given in the Specifications, the complete regulator/brush box assembly must be renewed (see illustration).
7.15 Compare the brush length with the figure given in the Specifications -
Lucas A127 alternator
16 Proceed as described in paragraphs 4 and 5 (see illustration).
7.16 Inspect the condition of the slip rings (arrowed) - Lucas A127
alternator
Motorola type
17 Remove the two securing screws and
withdraw the regulator. Disconnect the
regulator wires after noting their locations.
18 Remove the single securing screw (35 and 45 amp types) or two securing screws (55 and 70 amp types) and carefully withdraw the brush box.
19 If the length of either brush is less than the minimum given in the Specifications, the brush box must be renewed.
20 Proceed as shown in paragraphs 4 and 5.
Mitsubishi type
21 Unscrew the pulley nut. To prevent the
shaft rotating, insert an Allen key in the end of
the shaft.
22 Remove the spring washer, pulley, fan, spacer and dust shield.
23 Scribe an alignment mark along the length of the alternator to facilitate reassembly of the drive end housing, stator and rear housing.
24 Unscrew the through-bolts and withdraw the drive end housing from the rotor shaft.
25 Remove the seal and spacer from the rotor shaft.
26 Remove the rotor from the rear housing and the stator. This may require the application of local heat to the rear housing using a large soldering iron. Do not use a heat gun, as this may result in damage to the diodes.
27 Unscrew the four securing bolts and withdraw the diode pack stator assembly from the rear housing.
28 Unsolder the stator leads from the diode pack terminals. Use a pair of pliers when unsoldering to act as a heat sink, otherwise damage to the diodes may occur (see illustration).
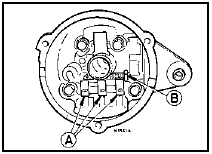
7.28 Stator-to-diode pack connections (A) and brushbox-to-diode pack terminal
(B) - Mitsubishi alternator
29 If the length of either brush is less than the minimum given in the Specifications, the brush box must be renewed.
30 To renew the brush box, unsolder the connection to the diode pack, and solder the connection to the new brush box. Use a pair of pliers as a heat sink to avoid damage to the diodes.
31 Examine the surfaces of the slip rings.
Clean them with a fuel moistened cloth, or if necessary fine glasspaper and then the cloth.
32 Solder the stator leads to the diode pack terminals, again using a pair of pliers as a heat sink.
33 Refit the diode pack/stator assembly to the rear housing and tighten the securing bolts.
34 Insert a thin rod (an Allen key is ideal) through the hole in the rear housing to hold the brushes in the retracted position.
35 Fit the rotor to the rear housing and then remove the temporary rod to release the brushes.
36 Reassemble the remaining components by reversing the dismantling operations. Make sure that the scribed marks are in alignment.
See also:
Integral heated rear window/radio aerial amplifier - removal and refitting
1 Disconnect the battery negative lead.
Saloon models
2 Remove both rear seat side cushions.
3 Remove the securing screws and withdraw
the rear parcel shelf.
4 Make a note of the wiring connectio ...
Facia panel switches - removal and refitting
1 Disconnect the battery negative lead.
Rocker switches and push button
switches
2 Using a thin-bladed screwdriver, carefully
prise the switch from the facia panel.
3 Disconnect the wiring plug a ...
Throttle cable - removal, refitting and adjustment
Removal
1 Disconnect the battery negative lead.
2 Working inside the vehicle, remove the
lower facia panel from the driver’s side.
3 Prise off the securing clip and disconnect
the end of the thro ...
