Load apportioning valve (P100 models) - adjustment
Models before mid-April 1989 1 The vehicle must be unladen, at normal kerb weight (a full tank of petrol, but no driver or load).
2 With the vehicle standing on its roadwheels, remove the spring clip and clevis pin, and detach the spring from the valve operating lever.
3 Loosen the locknut on the abutment block at the bottom of the spring (see illustration).
Hvac services Clifton best Clifton hvac furnace repair services.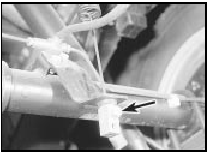
25.3 Loosen the locknut (arrowed) on the abutment block
4 Slide the spring through the grommet in the bracket on the axle, until the correct “X” dimension is obtained between the centre of the spring eye and the centre of the valve operating lever eye (see illustration).
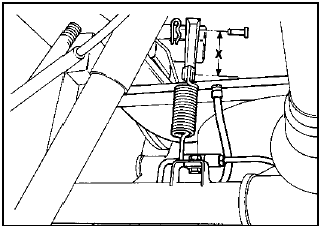
25.4 Load apportioning valve adjustment
X = 77.0 mm (3.0 in) with vehicle unladen at normal kerb weight
5 Hold the spring in position, slide the abutment block against the underside of the grommet, and tighten the locknut.
6 Attach the free end of the spring to the valve operating lever, and refit the clevis pin and spring clip.
Models from mid-April 1989 7 The procedure is as described above, but note that the dimension “X” has been revised to 92.0 mm (3.6 in) with the vehicle unladen at normal kerb weight.
See also:
Air Charge Temperature (ACT) sensor - removal and refitting
Removal
1 The air charge temperature sensor is
screwed into the inlet manifold (see
illustration).
14.1 Air charge temperature sensor - 1.6 EFI engine
A Wiring plug B Sensor
2 Disconnect the b ...
Radio/cassette player - removal and refitting
Standard fixing
1 Disconnect the battery negative lead.
2 Pull off the two control knob assemblies.
3 Release the trim panel by unscrewing the
two securing nuts from the control spindles.
Remove ...
Carburettor (Weber 2V TLD) - removal and refitting
Caution: Refer to the
precautions in Section 1 before
proceeding.
Note: A new gasket must be used when
refitting the carburettor. A tachometer and an
exhaust gas analyser will be required to chec ...
