Door - removal and refitting
Front door
1 On models with electric mirrors, electric
windows, central-locking, door-mounted
speakers, or “door ajar” sensors, remove the
trim panel and disconnect the wiring inside
the door. Withdraw the wiring loom(s) through
the grommet(s) in the front edge of the door.
2 Unscrew and remove the bolt securing the check arm to the body pillar (see illustration).
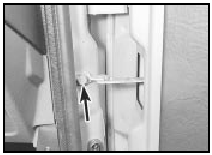
16.2 Remove the door check arm-to-body pillar bolt (arrowed)
3 Remove the two securing screws, and withdraw the side trim panel from the footwell.
4 If working on the driver’s side, remove the lower facia panels and disconnect the face level vent hose.
5 If working on the passenger side, remove the face level vent cover.
6 Support the door on blocks of wood.
7 Working through the body pillar aperture, unscrew the two securing nuts and remove the reinforcing plate from the lower hinge.
Repeat the procedure for the upper hinge (see illustration).
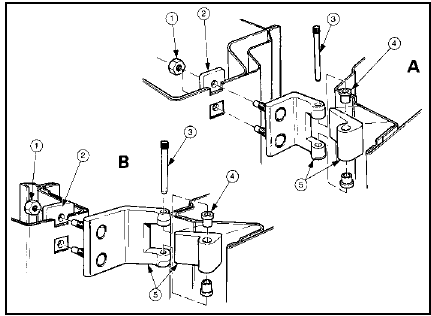
16.7 Exploded view of the front door hinge (A) and rear door hinge (B)
1 Nut
2 Reinforcing plate
3 Hinge pin
4 Bush
5 Hinge assembly
8 Withdraw the door from the vehicle.
9 Refitting is a reversal of removal, but do not fully tighten the hinge bolts until the door is positioned centrally in the body aperture and aligned with the surrounding bodywork. If necessary, remove the lock striker from the body centre pillar before adjusting the door, then refit it and adjust its position so that the lock operates correctly.
Rear door
10 On models equipped with electric
windows, central-locking, or “door ajar”
sensors, remove the trim panel and
disconnect the wiring inside the door.
Withdraw the wiring loom(s) through the grommet(s) in the front edge of the door.
11 Unscrew and remove the bolt securing the check arm to the body centre pillar.
12 Remove the centre pillar trim panel.
13 Proceed as described in paragraphs 6 to 9 inclusive.
Rear door (late model Estate) 14 The door internal components have been modified on later Estate models. If a new, later-specification rear door is to be fitted to an earlier vehicle, the door panels must be modified as follows to enable refitting of the original components.
15 Remove all the serviceable components and fasteners from the original door.
16 Working on the new door, use a small round file to elongate the door interior handle mounting hole “A” (see illustration) vertically downwards so that it will align with the mounting hole in the handle/ashtray bezel.
Refit the original retaining clip.
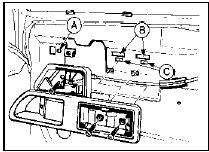
16.16 Later-type rear door - Estate models
A Internal handle mounting hole B Early-type ashtray/handle mounting holes C Revised mounting holes
17 The earlier type of trim fasteners (located at “B”) are no longer used, and must be replaced with the latest type of fasteners, available from a Ford dealer.
See also:
Engine - removal leaving automatic transmission in vehicle
Note: Refer to the warning at the beginning of
Section 5 before proceeding. A suitable hoist
and lifting tackle will be required for this
operation.
1 Proceed as described in paragraphs 1 to 21
o ...
AM/FM radio with compact disc player
Volume/power control
Ensure that the ignition switch is in
the ACC or ON position.
Press the control to turn the audio
system on. Turn the control to raise
or lower the volume.
Press the ...
Idle Speed Control Valve (ISCV) - removal, cleaning and
refitting
Removal
1 Disconnect the battery negative lead.
2 Disconnect the valve wiring plug (see
illustration).
12.2 Idle speed control valve - 1.6 EFI engine
A Wiring plug B Securing bolts
3 Unscrew t ...
