Fuel filler flap - removal and refitting
Removal
1 Open the filler flap and the tailgate or boot
lid, as applicable.
2 Remove the fuel filler cap and then remove the screw securing the filler housing to the fuel tank neck (see illustration).
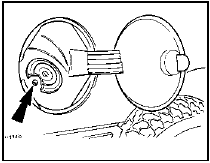
37.2 Fuel filler housing securing screw (arrowed) Ремонт торговых павильонов Дубай строительство и ремонт в Дубае.
3 Working inside the luggage compartment, depress the filler housing retaining tangs, and push the assembly out through the body panel. Recover the gasket.
4 Immerse the housing assembly in a container of hot water for approximately ten minutes, then prise the hinge cover from the housing, and using a screwdriver, prise the filler flap hinge legs out of the sockets in the housing.
Refitting
5 Commence refitting by warming the filler
flap and housing, as during removal, then
push the flap hinge legs into the housing.
6 Further refitting is a reversal of removal, ensuring that the housing gasket and retaining tangs are correctly located.
See also:
Hydraulic system - bleeding (conventional braking system)
Note: On cars equipped with the Anti-lock
Braking System, refer to Section 23.
Warning: Hydraulic fluid is
poisonous; wash off immediately
and thoroughly in the case of skin
contact, and seek imm ...
Air cleaner assembly - removal and refitting
Removal
1 Disconnect the battery negative terminal.
2 Disconnect the crankcase ventilation hoses
which are accessible from above, from the air
cleaner body (see illustration).
2.2 Disconnecting ...
Buying Spare Parts
Spare parts are available from many sources,
including maker’s appointed garages, accessory
shops, and motor factors. To be sure of
obtaining the correct parts, it will sometimes be
necessary to q ...
