Facia panels - removal and refitting
Models up to 1992
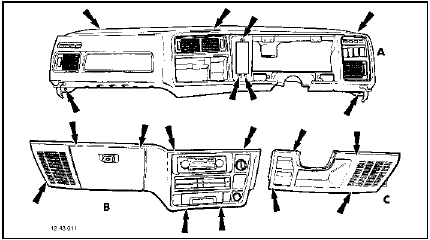
1 Note the locations of the facia panel
securing screws (see illustration).

43.1 Facia panel securing screw locations (arrowed)
https://countertopscolumbia.com quartz and granite countertops.
A Upper facia panel B Passenger side lower facia panel C Driverís side lower facia panel
Disconnect the battery negative lead.
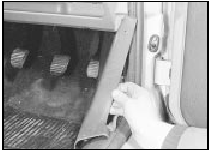
Driverís side lower facia panel 2 Remove the two securing screws and withdraw the side trim panel from the righthand side of the footwell (see illustration).

43.2 Withdraw the side trim panel from the footwell
3 Remove the securing screws and unclip the lower and upper steering column shrouds.
4 Unclip the trim panel from the lower edge of the lower facia panel.
5 Remove the four securing screws and withdraw the lower facia panel. Where applicable, disconnect the loudspeaker wiring.
6 Refitting is a reversal of removal.
Passenger side lower facia panel 7 Remove the two securing screws and withdraw the side trim panel from the lefthand side of the footwell.
8 Remove the centre console to gain access to the lower facia panel securing screws.
9 Unclip the trim panel from the lower edge of the lower facia panel.
10 Unscrew the seven securing screws and withdraw the lower facia panel. Disconnect the wiring from the loudspeaker, glovebox lamp, ashtray lamp, heater switch, cigarette lighter, radio/cassette player, and loudspeaker balance control, as applicable. It is advisable to label the wiring plugs to assist refitting in the correct positions.
11 Refitting is a reversal of removal.
Upper facia panel
12 Remove the lower facia panels as
described previously in this Section.
13 Remove the instrument panel (Chapter 13).
14 Where applicable, remove the trip computer and ďdoor ajarĒ monitor.
15 Remove the heater control panel.
16 Prise out the front and rear foglamp, heated rear window and heated windscreen switches and the instrument light and intermittent wiper rheostats, as applicable, from the upper facia panel, and disconnect their wiring plugs. It is advisable to label the wiring plugs to assist refitting in the correct positions.
17 Remove the five securing screws and withdraw the upper facia panel through the passenger door aperture. Disconnect the heater vent hoses, and ensure that any remaining wiring is disconnected and where applicable unclipped from the facia panel.
18 Refitting is a reversal of removal.
Models from 1992
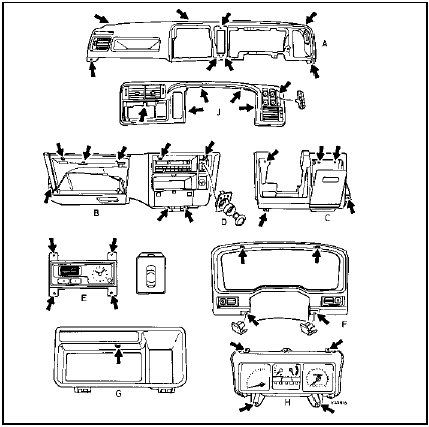
19 A restyled facia is fitted from 1992. The
procedures for removal and refitting of the
various panels are essentially as described
above, noting the following points (see
illustration).

43.19 Facia components and securing screw locations (arrowed) - models from
1992
A Upper facia panel
B Passengerís side lower facia panel
C Driverís side lower facia panel
D Heater fan control cover and bezel
E Clock/auxiliary warning system display
F Instrument panel surround and screw covers
G Clock/auxiliary warning system display surround
H Instrument cluster
J Instrument cluster surround
20 On models with an adjustable steering column, fully extend and lower the steering column before attempting to remove any of the panels on the driverís side.
21 The steering column shrouds are secured by six screws - five through the lower shroud, and one through the upper shroud.
22 If necessary, remove the centre console.
23 The driverís side lower facia panel is secured by five screws.
24 The passengerís side lower facia panel is secured by eight screws.
25 On models with an alarm, the alarm warning light must be disconnected and removed before removing the upper facia panel.
See also:
Flywheel/driveplate - removal, inspection and refitting
Note: The manufacturers recommend that the
flywheel/driveplate securing bolts are renewed
after slackening. Suitable thread-locking agent
will be required to coat the bolt threads.
Removal
1 If t ...
General information and precautions
General information
The fuel system comprises a centrally
mounted fuel tank, electrically-operated fuel
pump and Bosch K-Jetronic or KE-Jetronic
continuous injection system according to
model. Th ...
Throttle housing - removal and refitting
Note: During manufacture the throttle plate is
adjusted so that it is fractionally open, to avoid
the possibility of it jamming shut, and it must
not be repositioned. Idle speed adjustment is
prov ...
