Rocker gear - dismantling and reassembly
Dismantling 1 With the rocker assembly removed as described in Section 4, extract the split pin from one end of the rocker shaft (see illustration).
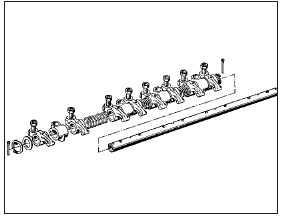
6.1 Rocker shaft assembly components
2 Take off the spring and plain washers from the end of the shaft.
3 Slide off the rocker arms, support pedestals and coil springs, keeping them in their originally fitted order. Clean out the oil holes in the shaft.
Reassembly
4 Apply engine oil to the rocker shaft before
reassembling and make sure that the flat on
the end of the shaft is to the same side as the
rocker arm adjuster screws. This is essential
for proper lubrication of the components.
See also:
Ford Escort maintenance schedule
The maintenance intervals in this manual are provided with the
assumption that you, not the dealer, will be carrying out the work. These
are the minimum maintenance intervals recommended by the
man ...
Brake hydraulic system (ABS) - bleeding
Caution: The rear brake
hydraulic circuit may be under
considerable pressure, take
care not to allow hydraulic fluid
to spray into the face or eyes. Refer to the
precautions in Section 1.
1 Keep ...
Exhaust system - renewal
1 The layout of the exhaust system varies
considerably according to model and engine.
All except the RS Turbo versions can be
renewed in sections; coupling sleeves are
supplied, enabling an old se ...
