Front disc pads - renewal
Warning: Renew both sets of front brake pads at the same time - never renew the pads on only one wheel, as uneven braking may result. Note that the dust created by wear of the pads may contain asbestos, which is a health hazard. Never blow it out with compressed air, and don’t inhale any of it. An approved filtering mask should be worn when working on the brakes. DO NOT use petrol or petroleum-based solvents to clean brake parts; use brake cleaner or methylated spirit only.
1 Slacken the roadwheel bolts, raise the front of the vehicle, support it with safety stands (see “Jacking and Vehicle Support”) and remove the roadwheel(s).
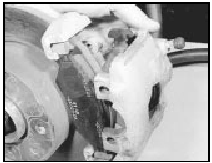
2 Where fitted, disengage the brake pad wear sensor from its retaining clip (beneath the bleed screw) and disconnect the lead connector (see illustration).
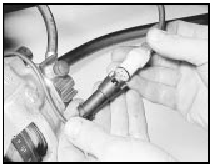
2.2 Disconnect the disc pad wear sensor lead at the connector
3 Using a screwdriver, prise free the retaining clip from the caliper (see illustration).
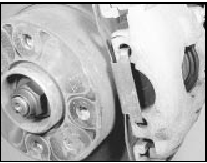
2.3 Disc pad retaining clip
4 Using a 7 mm Allen key, unscrew the bolts until they can be withdrawn from the caliper anchor brackets (see illustrations).
2.4a Unscrew the caliper bolt using an Allen key . . .
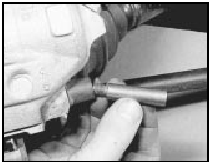
2.4b . . . and withdraw the bolt from the anchor bracket
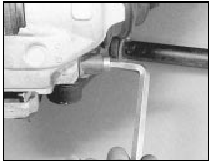
5 Withdraw the piston housing and tie it up with a length of wire to prevent strain on the flexible hose (see illustration).
2.5 Withdraw the caliper piston housing
6 Withdraw the inboard pad from the piston housing (see illustration).
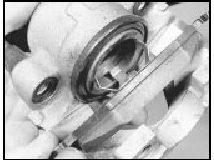
2.6 Removing the inboard pad from the piston housing . . .
7 Withdraw the outboard pad from the anchor bracket (see illustration).

2.7 . . . and the outboard pad from the anchor bracket
8 Clean away all residual dust or dirt, taking care not to inhale the dust as, being asbestos based, it is injurious to health.
9 Using a piece of flat wood, a tyre lever or similar, push the piston squarely into its bore.
This is necessary in order to accommodate the new thicker pads when they are fitted.
10 Depressing the piston will cause the fluid level in the master cylinder reservoir to rise, so anticipate this by siphoning out some fluid using an old hydrometer or poultry baster.
Take care not to drip hydraulic fluid onto the paintwork; it acts as an effective paint stripper.
11 Commence reassembly by fitting the inboard pad into the piston housing. Make sure that the spring on the back of the pad fits into the piston.
12 The wear sensor wire should be routed to ensure that it cannot chafe against any moving parts. Attach the wear sensor connector to the bleed screw clip (where applicable), and reconnect it.
13 Where the cable has become unwound, loosely coil the surplus wire so that slack is taken out, yet enough flexibility (25 mm) is still allowed for pad wear. The coiled wire must on no account be stretched.
14 Peel back the protective paper covering from the surface of the new outboard pad and locate it in the jaws of the caliper anchor bracket.
15 Locate the caliper piston housing and screw in the Allen bolts to the specified torque.
16 Fit the retaining clip.
17 Repeat the operations on the opposite brake.
18 Apply the footbrake hard several times to position the pads against the disc and then check and top-up the fluid in the master cylinder reservoir.
19 Fit the roadwheel(s) and lower the vehicle.
20 Avoid heavy braking (if possible) for the first hundred miles or so when new pads have been fitted. This is to allow them to bed in and reach full efficiency.
See also:
Fuel accumulator - removal and refitting
Note: Refer to the precautions at the end of
Section 1 before proceeding.
Pre-1986 models
Removal
1 The fuel accumulator is mounted adjacent
to the fuel pump, above the rear left-hand
suspension ...
Spark plug renewal - RS Turbo models (Every 6000 miles or 6
months)
1 The correct functioning of the spark plugs is
vital for the correct running and efficiency of
the engine. It is essential that the plugs fitted
are appropriate for the engine, and the
suitable t ...
Contact breaker points adjustment - models with contact breaker
distributor (Every 6000 miles or 6 months)
1 Spring back the retaining clips or undo the
screws as appropriate and lift off the
distributor cap.
2 Withdraw the rotor arm from the distributor
shaft.
3 Using a screwdriver, gently prise the
...
