
Windscreen wiper motor and linkage - removal and refitting
Removal
1 Remove the wiper arms and blades as
described in Section 17.
2 Disconnect the battery negative terminal.
3 Remove the nut covers, the fixing nuts, washers and spacers from the pivot shafts.
4 Disconnect the wiper motor wiring at the multi-pin plugs.
5 Unscrew the two fixing bolts and withdraw the motor complete with linkage from the engine compartment (see illustration).
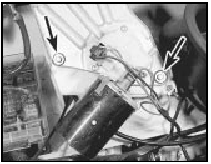
18.5 Windscreen wiper motor fixing bolts (arrowed)
6 Remove the spacers from the pivot shafts.
7 The motor can be separated from the linkage by removing the nut from the crankarm and then unbolting the motor from the mounting.
Refitting
8 Refitting is a reversal of removal, but
connect the motor crankarm when the link is
aligned with it as shown (see illustration).
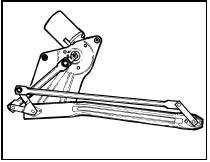
18.8 Windscreen wiper crankarm alignment for refitting
See also:
Timing belt - removal, refitting and adjustment
Removal
Note: From April 1988 (build code JG) a
modified timing belt tensioner incorporating a
larger diameter tensioner roller was
introduced, and from October 1988 an
improved timing belt was u ...
Cold start valve - removal and refitting
Note: Refer to the precautions at the end of
Section 1 before proceeding.
K-Jetronic system
Removal
1 Disconnect the battery earth lead.
2 Detach the electrical wiring multi-plug from
the valve ...
Air cleaner - removal and refitting
The procedure is similar to that described in
Part A of this Chapter for carburettor engines. ...
