Wash/wipe system components - removal and refitting
Windscreen washer pump
Engine compartment-mounted
reservoir
Removal
1 Drain the washer fluid container.
2 Disconnect the lead and washer pipe.
3 Ease the top of the washer pump away from the fluid container and remove it.
Refitting
4 Refitting is a reversal of removal; check that
the pump sealing grommet is a good fit.
Windscreen washer pump - wingmounted
reservoir
Removal
5 On some models the windscreen washer
pump and fluid reservoir are mounted on the
forward end of the underside of the left-hand
front wing panel. It also incorporates the
headlamp washer pump which also draws its
fluid from this reservoir.
6 To remove the reservoir and pump units withdraw the level dipstick and syphon the fluid out of the reservoir through the filler neck.
7 Unscrew and remove the reservoir retaining bolts at its top end from inside the engine compartment.
8 Working under the wheel arch, unscrew and remove the two lower retaining bolts.
9 Withdraw the reservoir, carefully pulling its filler neck through the grommet on the inner wing panel. Disconnect the pump hoses.
10 The pump and fluid level sensor unit can be eased away from their location apertures in the reservoir.
Refitting
11 Refitting is a reversal of removal; check
that the pump and fluid level sensor grommets
are in good condition when reassembling, and
check for leaks on completion.
Tailgate washer pump
Saloon models
Removal
12 Remove the load space trim panel as
described in Chapter 11.
13 Disconnect the leads at the multi-plug.
14 Unscrew the three reservoir mounting screws, and remove the reservoir until the fluid pipe can be pulled from the pump.
15 With the reservoir removed, pull the pump from its reservoir seal.
Refitting
16 Refit by reversing the removal operations.
Estate models
Removal
17 Open the tailgate, raise the spare wheel
cover and disconnect the electrical leads and
fluid pipe from the pump.
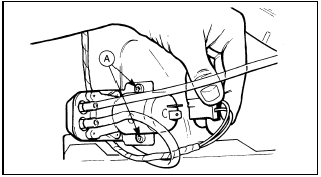
18 Extract the two securing screws and remove the pump (see illustration).

20.18 Tailgate washer pump retaining screws (A) - Estate models
Refitting 19 Refitting is a reversal of removal.
Windscreen washer jets
Single jet system - pre-1986 models
Removal
20 Open the bonnet and disconnect the
washer pipe from the jet.
21 If the pipe stub on the jet assembly is now pushed to one side, the jet retaining tang will be released and the jet can be removed from the bonnet grille slots.
Refitting
22 Refit by reversing the removal operations.
The end of the plastic washer pipe should be warmed in very hot water to make it easier to push onto the jet pipe stub and so avoid breaking it.
23 Adjustment of the jet spray pattern can be done using a pin in the jet nozzle.
Twin jet system - pre-1986 models 24 Later models are fitted with a twin jet windscreen washer system instead of the single jet type used on earlier models.
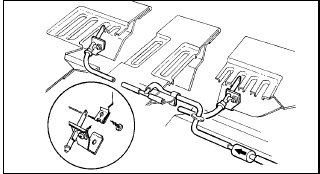
25 The jets are located as shown, one each side on the bonnet inner panel (see illustration). The washer supply hose is connected to a central T-piece connector which directs the fluid to each jet.

20.25 Twin jet windscreen washer layout - pre-1986 models
26 The twin jets can be adjusted in the same manner as the earlier single type. They should be set so that the fluid jets hit the windscreen about 250 mm (9.8 in) from the top edge of the windscreen.
Twin jet system - 1986 models
onwards
27 1986 models onwards are fitted with a
twin jet system but using the same jet type as
the early single jet system.
28 Removal, refitting and adjustment procedures for this washer type are therefore the same as described previously.
Tailgate washer jet
Removal
29 Remove the tailgate wiper motor as
described in Section 19.
30 Pull the washer jet off the tailgate wiper motor shaft, disconnect the hose and remove the jet.
Refitting
31 Refitting is the reverse of removal.
Headlamp washer pump
Removal
32 Drain the washer reservoir by siphoning,
and disconnect the electrical leads from the
pump.
33 Disconnect the fluid pipe from the pump.
34 Release the reservoir clamp screw.
35 Ease the top of the pump from the reservoir and remove it upwards.
Refitting
36 Refitting is a reversal of removal.
Headlamp washer jet
37 The headlamp washer jets are an integral
part of the bumper overrider and cannot be
removed separately. If a jet is to be renewed
for any reason the complete overrider must be
obtained (see Chapter 11).
38 Adjustment of the jets entails the use of special tool 32-004. If the tool is not available, have this work carried out by a Ford dealer.
See also:
OHV and HCS engines
The 1.1 litre and 1.3 litre OHV engines are of four-cylinder,
in-line overhead valve type (hence OHV), mounted transversely together with the
transmission, at the front of the car.
The crankshaft ...
Dimensions and Weights
Note: All figures are approximate, and may vary according to
model. Refer to manufacturer’s data for exact figures.
Dimensions
Overall length:
Pre-1986 models:
Saloon and Cabriolet . . . . . . . ...
Crankshaft and main bearings - removal and refitting
1.8 litre (R2A type)
Removal
1 With the engine removed from the vehicle,
remove the timing belt, crankshaft sprocket
and thrustwasher.
2 Remove the pistons and connecting rods. If
no work is to ...
