
Ignition system component check (Every 24 000 miles (40 000 km) or 2 years)
1 Before disturbing any part of the ignition system, disconnect the battery negative lead.
2 Identify and clearly mark all HT leads before disconnecting them from the spark plugs.
3 Refer to the appropriate Section in Chapter 5 and, where applicable, remove the distributor cap and rotor arm.
4 Clean the HT leads and distributor cap with a dry cloth. Scrape any corrosion or other deposits from the connectors and terminals.
Also clean the coil tower.
5 Renew the HT leads if they are cracked, burnt or otherwise damaged. If a multi-meter is available, measure the resistance of the leads. The desired value is given in the Specifications of Chapter 5.
6 Renew the distributor cap if it is cracked or badly burnt inside, or if there is evidence of “tracking” (black lines marking the path of HT leakage). If there is a carbon brush at the centre of the cap, make sure that it moves freely, and is not excessively worn (see illustration).
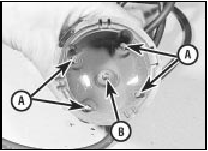
39.6 Bosch distributor cap showing HT segments (A) and carbon brush (B)
7 Clean the metal track of the rotor arm with fine abrasive paper. Renew the arm if it is cracked or badly burnt.
8 Refit the rotor arm and distributor cap.
9 Reconnect the HT leads to the spark plugs and coil.
10 Reconnect the battery and run the engine.
See also:
Exhaust manifold nut check - RS Turbo models (Every 6000 miles
or 6 months)
Check the tightness of the exhaust
manifold securing nuts using a torque wrench. ...
Crankshaft and main bearings - removal and refitting
1.8 litre (R2A type)
Removal
1 With the engine removed from the vehicle,
remove the timing belt, crankshaft sprocket
and thrustwasher.
2 Remove the pistons and connecting rods. If
no work is to ...
Air bag supplemental restraint system (SRS)
Important SRS precautions
The SRS is designed to work with
the safety belt to help protect the
driver and right front passenger
from certain upper body injuries. Air
bags DO NOT inflate slowl ...
