Air conditioning system - component renewal
1 Only those items which can be renewed without discharging the system are described here (see illustration). Other items must be dealt with by a Ford dealer or air conditioning specialist.
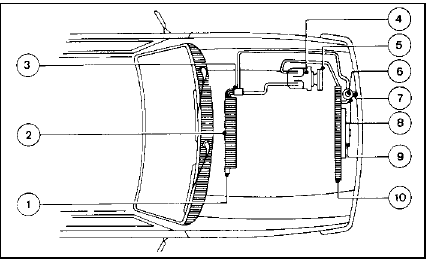
21.1 Layout of air conditioning system components
1 De-ice thermostat
2 Evaporator
3 Expansion valve
4 Compressor
5 Compressor clutch
6 Pressure switch
7 Sight glass
8 Dehydrator/collector
9 Cooling fan
10 Condenser
Compressor drivebelt
2 Disconnect the battery negative lead.
3 On SOHC models, remove the thermoviscous cooling fan.
4 Slacken the compressor mounting and pivot bolts, move the compressor towards the engine and remove the old drivebelt (see illustration).
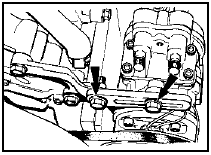
21.4 Typical air conditioning compressor mounting and pivot bolts (arrowed)
5 Fit the new drivebelt, position the compressor to achieve the correct belt tension, then tighten the mounting and pivot bolts.
6 On SOHC models, refit the thermo-viscous cooling fan.
7 Reconnect the battery negative lead.
Condenser fan and motor
Models up to 1987
8 Disconnect the battery negative lead, and
remove the radiator grille. On Ghia models,
remove the front bumper.
9 Disconnect the fan wiring connector at the side of the condenser.
10 Remove the three securing bolts and withdraw the fan assembly. Turn the frame to position the fan wiring on the dehydrator side to avoid damaging the wiring. Take care also not to damage the condenser fins or tube.
11 To remove the fan blades from the motor, remove the retaining nut and circlip. The nut has a left-hand thread, ie, it is undone in a clockwise direction.
12 With the blades removed, the motor can be unscrewed from the frame.
13 Reassemble and refit in the reverse order of dismantling and removal.
Models from 1987
14 Disconnect the battery negative lead.
15 Remove the bonnet lock.
16 Unclip the guard from the fan frame.
17 Disconnect the fan wiring connector (see illustration).
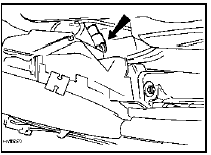
21.17 Air conditioning condenser fan wiring connector location (arrowed) -
models from 1987
18 Apply the handbrake, jack up the front of the vehicle and support on axle stands (see “Jacking and Vehicle Support”).
19 Unscrew the two lower condenser securing bolts and disengage the condenser from the top of the radiator by releasing the three clips.
20 Unscrew the four securing bolts and detach the fan assembly from the condenser.
Withdraw the fan assembly from underneath the vehicle.
21 Proceed as described in paragraphs 11 to 13 inclusive.
De-ice thermostat
22 Disconnect and remove the battery.
23 Disconnect any vacuum hoses, windscreen washer hoses and electrical wiring as necessary, then unscrew the four securing bolts and on models up to 1987 the single nut, and remove the right-hand plenum chamber cover plate from the bulkhead.
24 Disconnect the thermostat from the evaporator casing and withdraw it. Also withdraw the thermostat probe from the casing.
25 Refitting is a reversal of removal.
Heating/air conditioning controls 26 The procedure is similar to that described for the heater controls but additionally the vacuum hoses must be disconnected from the control unit vacuum valve during removal, and reconnected when refitting.
See also:
Ignition switch and lock barrel - removal and refitting
Removal
1 Disconnect the battery negative lead.
2 For improved access, remove the securing
screws and unclip the lower and upper
steering column shrouds.
3 Insert the ignition key and turn to pos ...
Manual transmission oil level check (Every 12 000 miles or 12
months)
1 With the car on level ground wipe the area
around the filler plug, then unscrew the plug
using a socket spanner, or on later versions a
suitable Torx or Allen key or socket bit, as
applicable. A ...
Door window - removal and refitting
Front door
1 Remove the door inner trim panel.
2 Where necessary for access, peel back the
waterproof plastic sheet from the door.
3 Remove the door mirror.
4 Remove the window channel extension
...
