Rear suspension and final drive unit assembly (Saloon, Hatchback and Estate models) - removal and refitting
Note: From May 1986, revised final drive unit rear mounting bolts have been used in production. Whenever the earlier type of bolts are removed, they should be discarded and the later type fitted. The earlier bolts are coloured blue, and the later type bolts are coloured gold.
Removal
1 Jack up the vehicle and support on axle
stands (see “Jacking and Vehicle Support”). It
is only strictly necessary to jack up the rear of
the vehicle, but this provides only limited
access. Note that the axle stands should be
positioned under the side members.
2 Remove the rear section of the exhaust system - ie. from the joint.
3 Remove the propeller shaft.
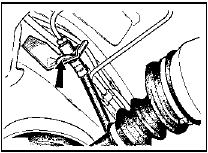
4 Disconnect the handbrake equaliser from the operating rod by removing the circlip and pivot pin. Take care not to lose the components (see illustration).
10.4 Handbrake equaliser-to-operating rod circlip and pivot pin (arrowed)
5 Remove the brake cable sheaths from their brackets on the vehicle underbody.
6 Unscrew the brake pipes from the brake hoses at the brackets on the vehicle underbody. Plug the ends of the pipes and hoses to prevent leakage and dirt ingress, then detach the hoses from the brackets by removing the U-shaped retaining clips (see illustration).
10.6 Rear underbody brake pipe bracket - U-shaped hose retaining clip arrowed
7 Where applicable, disconnect the ABS sensors, and detach the leads from the clips on the lower arms.
8 Place suitable blocks beneath the rear wheels, then lower the vehicle so that the rear coil springs are lightly loaded. Reposition the axle stands under the side members.
9 Support the final drive unit with a jack, using an interposed block of wood to spread the load.
10 Where applicable, unscrew and remove the two anti-roll bar mountings from the underbody.
11 Unscrew and remove the three bolts securing each of the front guide plates to the underbody and the suspension crossmember (see illustration). Where applicable, bend back the lockwasher tabs on the larger bolts.
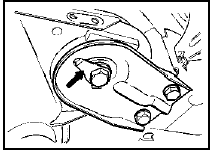
10.11 Rear suspension front guide plate - lockwasher arrowed
12 Unscrew and remove the four bolts securing the final drive unit rear mounting to the underbody. Note the location and number of any shims which may be fitted (see illustration).
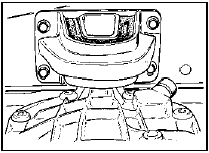
10.12 Final drive unit-to-underbody rear mounting
13 Working inside the rear of the vehicle, disconnect the shock absorber upper mountings. On Saloon and Hatchback models, access is gained by removing the trim covers behind the side cushions. Each cover is secured by two self-tapping screws, and the shock absorber is secured by a bolt and nut. On Estate models, fold down the rear seat backrest, fold back the floor covering and remove the front section of the luggage compartment floor, which is secured with 12 self-tapping screws. Remove the nut and washer from the shock absorber.
14 Using a jack and a wooden beam positioned beneath the longitudinal underbody side members, raise the rear of the vehicle until the rear suspension and final drive unit assembly can be withdrawn from under the vehicle.
15 If desired, the assembly can be dismantled with reference to the relevant Sections of this Chapter and Chapter 9.
Refitting
16 Refitting is a reversal of removal, bearing
in mind the following points.
17 Where applicable, secure the larger front guide plate bolts by bending up the lockwasher tabs.
18 Ensure that the coil springs are located correctly on their seats on the vehicle underbody.
19 When refitting the final drive rear mounting to the underbody, refit any shims in their original noted positions, and fit the bolts with reference to the note at the beginning of this Section.
20 Tighten all fixings to the specified torque.
21 On completion, bleed the brakes and adjust the handbrake. With the vehicle level, check the final drive unit oil level.
See also:
Rear shock absorber (Saloon and Estate models) - removal,
testing and refitting
Removal
1 Slacken the roadwheel bolts, raise the rear
of the vehicle, support it on stands (see
“Jacking and Vehicle Support”) and remove
the roadwheel.
2 Support the suspension lower arm with a
...
Contact breaker points renewal (Every 12 000 miles or 12
months)
1 Spring back the retaining clips or undo the
screws as appropriate and lift off the
distributor cap.
2 Withdraw the rotor arm from the distributor
shaft.
3 On the Bosch distributor disconnect th ...
EEC IV system components - removal and refitting
Note: Procedures for removal and refitting of
the ignition system components and
electronic module are given elsewhere in the
relevant Sections of this Chapter.
Engine coolant temperature
sensor
...
