Locks and Security
KEYS
The key operates all locks on your vehicle. In case of loss, replacement keys are available from your dealer.
You should always carry a second key with you in a safe place in case you require it in an emergency.
POWER DOOR LOCKS (IF EQUIPPED)
Press U to unlock all doors and L to
lock all doors. 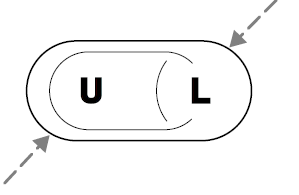
INTERIOR LUGGAGE COMPARTMENT RELEASE
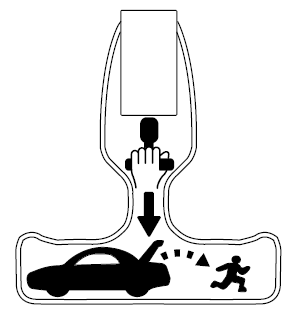
Your vehicle is equipped with a mechanical interior luggage compartment release handle that provides a means of escape for children and adults in the event they become locked inside the luggage compartment.
Adults are advised to familiarize themselves with the operation and location of the release handle.
To open the luggage compartment door (lid) from within the luggage compartment, pull the illuminated "T" shaped handle and push up on the trunk lid. The handle is composed of a material that will glow for hours in darkness following brief exposure to ambient light.
The "T" shaped handle will be located either on the luggage compartment door (lid) or inside the luggage compartment near the tail lamps.
Keep vehicle doors and luggage compartment locked and keep keys and remote transmitters out of a child's reach.
Unsupervised children could lock themselves in the trunk and risk injury. Children should be taught not to play in vehicles.
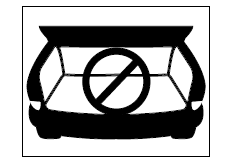
On hot days, the temperature in the trunk or vehicle interior can rise very quickly. Exposure of people or animals to these high temperatures for even a short time can cause death or serious heat-related injuries, including brain damage. Small children are particularly at risk.
REMOTE ENTRY SYSTEM (IF EQUIPPED)
This device complies with part 15 of the FCC rules and with RS-210 of Industry Canada. Operation is subject to the following two conditions: (1) This device may not cause harmful interference, and (2) This device must accept any interference received, including interference that may cause undesired operation.
Changes or modifications not expressly approved by the party responsible for compliance could void the user's authority to operate the equipment.
Your vehicle may have an all-door remote entry system or a driver's door only remote entry system.
The all-door remote entry system allows you to:
- lock or unlock all vehicle doors without a key.
- arm and disarm the anti-theft system. (For more information on the anti-theft system, refer to Anti-theft system in this chapter.)
- open the trunk.
- activate the panic alarm.

The driver's door only entry system allows you to:
- lock the driver's door
- unlock the driver's door only without a key.
- activate the panic alarm.
- open the trunk
The remote entry features only operate with the ignition in the LOCK position.
If there is any potential remote keyless entry problem with your vehicle, ensure ALL remote entry transmitters are brought to the dealership, to aid in troubleshooting.
Unlocking the doors 
1. Press  and release to unlock
the driver's door. Note: The interior
lamps will illuminate.
2. With the all-door remote entry, press
 and release again within
three seconds to unlock all the doors.
The remote entry system activates the illuminated entry feature. This feature turns on the interior lamps for 20 seconds or until the ignition is turned to the ON position. The dome lamp control must be set to the DOOR position in order for the illuminated entry feature to operate.
Locking the doors 
1. Press and release to lock all
the doors. On vehicles equipped with
the driver's door only remote entry system, only the driver's door will
lock.
Note: the interior lamps will turn off.
2. On vehicles with the all-door remote entry, press
 and release again
within three seconds to confirm that all the doors are closed and locked.
Note: the doors will lock again, the horn will chirp once and the headlamps will flash.
If any of the doors are not properly closed the horn will make two quick chirps.
This process will also activate the vehicle's anti-theft system (if equipped). For more information on arming the anti-theft system, refer to Anti-theft system in this chapter.
Opening the trunk 
Press  once to open the trunk.
- Ensure that the trunk is closed and latched before driving your vehicle. Failure to properly latch the trunk may cause objects to fall out or block the driver's rear view.
Sounding a panic alarm
Press to activate the alarm. Press
again or turn the ignition to ACC
or ON to deactivate.
Note: The panic alarm will only operate when the ignition is in the OFF position.
Replacing the battery
The remote entry transmitter uses one coin type three-volt lithium battery CR2032 or equivalent. The typical operating range for your remote entry transmitter is approximately 10 meters (33 feet). A decrease in the operating range could be caused by:
- weather conditions,
- nearby radio towers,
- structures around the vehicle and
- other vehicles parked next to the vehicle.
To replace the battery:
1. Twist a thin coin between the two halves of the remote entry transmitter near the key ring. DO NOT TAKE THE FRONT PART OF THE REMOTE ENTRY TRANSMITTER APART.

2. Remove the old battery.
3. Insert the new battery. Refer to the diagram inside the remote entry transmitter for the correct orientation of the battery.
4. Snap the two halves back together.
Note: Replacement of the battery will not cause the remote transmitter to become deprogrammed from your vehicle. The remote transmitter should operate normally after battery replacement.
Replacing lost remote entry transmitters
If you would like to have your remote entry transmitter reprogrammed because you lost one, or would like to buy additional remote entry transmitters, you can either reprogram them yourself, or take all remote entry transmitters to your authorized dealer for reprogramming.
How to reprogram your remote entry transmitters
You must have all remote entry transmitters (maximum of four) available before beginning this procedure.
To reprogram the remote entry transmitters:
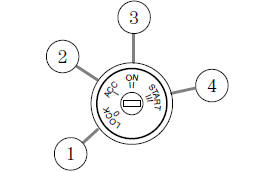
1. Ensure the vehicle is electronically unlocked.
2. Put the key in the ignition.
3. Turn the key from the 1 (LOCK) position to 2 (ACC).
4. Cycle, eight times, rapidly (within 10 seconds) between the 2 (ACC) position and 3 (ON).
Note: The eighth turn must end in the 3 (ON) position.
5. The doors will lock, then unlock, to confirm that the programming mode has been activated.
6. Within 20 seconds press any button on the remote entry transmitter.
Note: If more than 20 seconds have passed you will need to start the procedure over again.
7. The doors will lock, then unlock, to confirm that this remote entry transmitter has been programmed.
8. Repeat Step 6 to program each additional remote entry transmitter.
9. Turn the ignition to the 2 (ACC) position (or wait twenty seconds) after you have finished programming all of the remote entry transmitters.
10. The doors will lock, then unlock, to confirm that the programming mode has been exited.
ANTI-THEFT SYSTEM (IF EQUIPPED)
When activated, the anti-theft system will help prevent your vehicle from unauthorized entry.
If there is any potential remote keyless entry problem with your vehicle, ensure ALL remote entry transmitters are brought to the dealership, to aid in troubleshooting.
Activating the anti-theft system
Turn the ignition to the 1 (LOCK) position, remove the key and press

on the remote entry transmitter.
Identifying an activated system
While the system is activating, the THEFT indicator, located in the instrument cluster, will illuminate for 30 seconds. After 30 seconds, the indicator will flash, indicating the system is activated.
If the system is activated with the doors open, the THEFT indicator will remain illuminated until all the doors are closed, then illuminate for 30 seconds and begin flashing.
When an unauthorized entry occurs, the activated system will:
- flash the parking lamps and the THEFT indicator, and
- sound the horn.
The flashing parking lamps and the honking horn automatically shut off after approximately three minutes, and will remain off unless another unauthorized entry is attempted.
Deactivating the anti-theft system
Deactivating an untriggered anti-theft system
You can deactivate an untriggered anti-theft system alarm in the following ways:
- Press
 on the remote entry
transmitter. - Press
 on the remote entry
transmitter.
Note: Pressing the trunk control will prevent the alarm from sounding until the trunk is closed again.
Note: Using the ignition key to unlock the doors or trunk will not disarm the anti-theft system.
Deactivating a triggered anti-theft system
You can deactivate a triggered anti-theft system alarm in the following ways:
- Press
 on the remote entry
transmitter. - Press
 on the remote entry
transmitter. - Insert the key into the ignition and turn to the 2 (ACC) or 3 (ON) positions.
See also:
Spark plug renewal (Every 12 000 miles or 12 months)
The procedure is as described for RS Turbo
models in Section 15. ...
Braking system warning lamps and electrical switches - removal
and refitting
General
1 All models are fitted with a low fluid level
warning switch in the master cylinder reservoir
cap and a brake pedal stop-lamp switch.
2 Some versions have front disc pad wear
sensors and ...
Fuel system - depressurising
Warning: The fuel system will
remain pressurised after the
engine is switched off. Comply
with relevant safety precautions
during this operation and refer to the
“Safety First” Section at the beg ...
