Pressure regulating valve (Saloon and Estate models) - removal and refitting
1 The brake pressure regulating valve is located within the engine compartment, just above the aperture in the wing inner panel through which the steering tie-rod passes. On pre-1986 models the valves comprise a metal housing bolted to the inner panel. On later models the valves, one for each brake circuit, are individually located in a bracket attached to the inner panel (see illustrations).
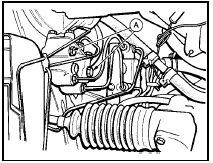
13.1a Pressure regulating valve mounting bolts (A) - pre-1986 models
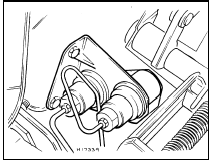
13.1b Pressure regulating valves and mounting bracket - 1986 models onward
Removal
Note: Before starting work, refer to the
warning at the beginning of Section 3
concerning the dangers of hydraulic fluid.
2 Unscrew the unions, noting their locations and disconnect the hydraulic pipes from the valve(s). Cap the ends of the pipes with bleed nipple dust caps to prevent fluid loss.
3 Unscrew the mounting bolts and remove the valve or mounting bracket as applicable.
On later models extract the retaining clips and remove the valves from the bracket (see illustration).
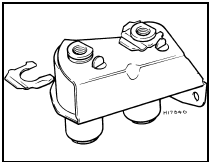
13.3 Pressure regulating valve-to-bracket retaining clip - 1986 models onward
4 On both versions the valves are sealed units and only serviced as complete assemblies.
Refitting
5 Refitting is the reverse sequence to removal
but bleed the hydraulic system as described
in Section 11 on completion.
See also:
Thermostat - removal and refitting
1 Disconnect the battery negative lead.
2 Drain the cooling system.
3 Proceed as follows according to model:
SOHC models
4 Disconnect the radiator top hose and
expansion tank hose from the thermo ...
Handbrake cable - adjustment
Note: Where fitted, the adjuster locking pin
must be renewed on completion of
adjustment.
Conventional braking system
(except P100 models)
1 The handbrake cable is normally
self-adjusting in use ...
Examination and renovation
Crankshaft, bearings, cylinder
bores and pistons
1 Refer to Section 13 in Part A of this Chapter.
The information applies equally to the CVH
engine, except that standard sized crankshafts
are unm ...
