Rear shock absorbers (Van models) - removal, testing and refitting
Removal
1 Raise and support the rear of the vehicle on
stands (see “Jacking and Vehicle Support”).
Place a jack beneath the rear axle tube and just raise it slightly.
2 Disconnect the shock absorber lower mounting by unscrewing the nut and pivot bolt.
3 Unbolt the top mounting bracket from the body and withdraw the unit (see illustration).
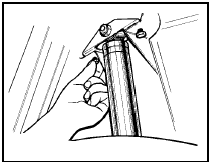
11.3 Removing the rear shock absorber top mounting bracket - Van models
4 Undo the nut and pivot bolt to separate the mounting bracket from the shock absorber.
Testing
5 Proceed as described in Section 10.
Refitting
6 Refitting is a reversal of removal, but if a
new unit is being installed, prime it first in a
similar way to that described for testing.
See also:
Fuel pressure regulator - removal and refitting
Caution: Refer to the
precautions in Section 1 before
proceeding.
2.0 litre SOHC models
1 Disconnect the battery negative lead.
2 Slowly loosen the fuel feed union to relieve
the pressure in the ...
Diagram 1a: 1986-on Starting, charging, and ignition (except
fuel injection) all models
Diagram 1a: 1986-on Starting, charging, and ignition (except fuel injection)
all models ...
Crankshaft front oil seal - renewal
Note: A suitable puller will be required to
remove the crankshaft pulley. A new
crankshaft pulley bolt, and a new lower timing
chain cover gasket, must be used on refitting.
1 The crankshaft front ...
