Bonnet - removal and refitting
Removal
1 Open the bonnet and support it on its stay.
2 Disconnect the screen washer pipe on the underside of the bonnet lid (see illustration).
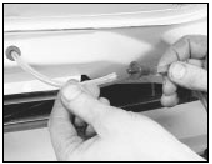
7.2 Disconnecting the windscreen washer fluid pipe
3 Where applicable, disconnect the earth lead from the bonnet.
4 Mark round the hinge plates on the underside of the bonnet lid as an aid to refitting.
5 With an assistant supporting one side of the bonnet lid, unbolt the hinges and lift the lid from the vehicle.
Refitting
6 Refit by reversing the removal operations. If
a new bonnet is being installed, position it so
that an equal gap is provided at each side
when it is being closed.
7 The bonnet should close smoothly and positively without excessive pressure. If it does not, carry out the following adjustment.
8 Screw in the bump stops which are located on the front upper cross rail (see illustration).
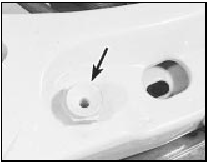
7.8 Bonnet bump stop (arrowed)
Close the bonnet and then readjust the bump stops until the bonnet is flush with the wing upper surfaces.
9 Adjust the striker centrally in relation to the latch. Release it by unscrewing its pressed steel locknut.
10 Screw the striker in or out until the bonnet fully closes under its own weight when allowed to drop from a point 300 mm (12 in) above its released position.
See also:
Rear wheel cylinder - removal, overhaul and refitting
Note: Before starting work, refer to the
warning at the beginning of Section 2
concerning the dangers of asbestos dust, and
to the warning at the beginning of Section 3
concerning the dangers of h ...
Vacuum servo unit and linkage - removal and refitting
Removal
1 Refer to Section 12 and remove the master
cylinder.
2 On fuel-injection models unclip and lift out
the front section of the heater plenum
chamber to provide access to the connecting
li ...
Manifolds, exhaust and emission control systems
All models utilise a light alloy inlet manifold which on
carburettor models is coolant heated to improve the atomisation of the fuel/air
mixture.
The exhaust manifold is of cast iron construction ...
