Doors - removal and refitting
Front door
Pre-1986 models
Removal
1 Open the door fully and support its lower
edge on a jack or blocks covered with a pad
of cloth to prevent scratching.
2 Unscrew the two bolts which hold the check arm bracket to the body and disconnect the arm.
3 Remove the scuff plate from the sill at the bottom of the door aperture.
4 Unclip the lower cowl side trim panel, and where fitted remove the radio speaker (Chapter 12).
5 Remove the heater duct.
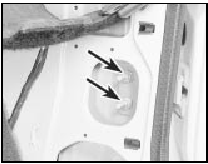
6 On cars with electrically operated windows, mirrors or central locking, disconnect the wiring multi-plug from inside the passenger compartment and feed the wires through the aperture in the pillar.
7 Unbolt the door lower hinge from the body pillar (see illustrations).
12.7a Front door lower hinge nuts (arrowed)
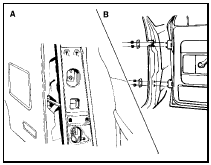
12.7b Door hinge assemblies - pre-1986 models
A Rear door B Front door
8 Unbolt the upper hinge from the body pillar, then lift the door from the vehicle.
Refitting
9 Refitting is a reversal of removal, but do not
fully tighten the hinge bolts until the alignment
of the door within the body aperture has been
checked.
1986 models onwards
10 The procedure is as described previously
in this Section for pre-1986 models, but it is
necessary to extract the pin from the upper
hinge rather than unbolting the hinge from the
pillar. To do this, ideally special tool 41-018 is
needed, but a suitable alternative can be
made from a piece of metal with a U-shaped
cut-out which will engage under the head of
the pin (see illustrations).
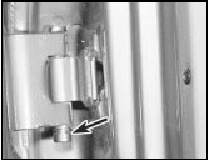
12.10a Front door upper hinge pin (arrowed) on 1986 models onwards
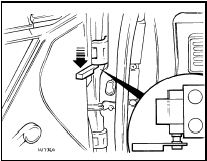
12.10b Front door upper hinge pin removal using special tool - 1986 models
onwards
Strike the tool downward to remove the pin. When refitting, tap the pin upwards into place.
Rear door
Saloon and Estate models
11 The operations are similar to those
described for the front door on pre-1986
models, except that the centre pillar trim
panels must be removed for access to the
hinge bolts.
Van models
Removal
12 Begin by opening the door to its full extent
and supporting it on a jack or blocks, with a
pad of cloth used to prevent scratching.
13 Disconnect the check strap from its lower edge.
14 Unbolt the hinges from the door and remove the door from the vehicle.
Refitting
15 Refitting is a reversal of removal, but do
not fully tighten the hinge bolts until the
alignment of the door within the body aperture
has been checked.
See also:
Fuel pump - testing
Caution: Refer to the
precautions in Section 1 before
proceeding.
Mechanical pump
1 On SOHC engines, the fuel pump is located
on the left-hand side of the cylinder block,
next to the oil filter. ...
Turbocharger-to-manifold nut check - RS Turbo models (Every 12
000 miles or 12 months)
Check the tightness of the turbocharger-toexhaust
manifold securing nuts using a torque
wrench. ...
Ignition HT coil - testing, removal and refitting
Note: Refer to the precautions given in
Section 1 before proceeding.
All except models with DIS
ignition system
Testing
1 Accurate checking of the coil output
requires the use of special test eq ...
