Carburettor (Weber 2V type) - fast idle speed adjustment
1 This procedure does not apply to models fitted with a carburettor stepper motor, for which no adjustment is possible.
2 Check the idle speed and mixture. The idle speed must be correct before attempting to check or adjust the fast idle speed.
3 With the engine at normal operating temperature, and a tachometer connected in accordance with the manufacturer’s instructions, proceed as follows.
4 Remove the air cleaner.
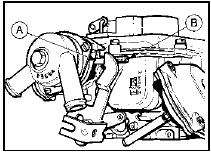
5 Partially open the throttle, hold the choke plate(s) fully closed, then release the throttle so that on 1.6 litre models the fast idle adjustment screw rests on the third (middle) step of the fast idle cam (see illustration)

18.5a Fast idle speed adjustment - Weber 2V carburettor (1.6 litre models)
A Screw on third (middle) step of cam B Fast idle screw

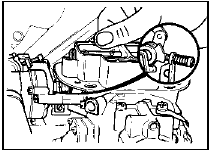
18.5b Fast idle speed adjustment - Weber 2V
carburettor (2.0 litre models)
and on 2.0 litre models the fast idle adjustment screw rests on the highest step of the fast idle cam (see illustration).
6 Release the choke plate(s), checking that it/they remain(s) fully open; if not, the automatic choke mechanism is faulty, or the engine is not at normal operating temperature.
7 Without touching the throttle pedal, start the engine and check that the fast idle speed is as specified. If adjustment is necessary, turn the fast idle adjustment screw until the correct speed is obtained.
8 On completion of adjustment, stop the engine and disconnect the tachometer, then refit the air cleaner.
See also:
Seating
Notes:
Reclining the seatback can cause an occupant to slide under the
seat's safety belt, resulting in severe personal injuries in the
event of a collision.
Do not pile cargo higher than the seat ...
Rear shock absorber (Saloon and Estate models) - removal,
testing and refitting
Removal
1 Slacken the roadwheel bolts, raise the rear
of the vehicle, support it on stands (see
“Jacking and Vehicle Support”) and remove
the roadwheel.
2 Support the suspension lower arm with a
...
Fuel injector - removal and refitting
Note: Refer to the precautions at the end of
Section 1 before proceeding. New injector
seals will be required on refitting.
Removal
1 Disconnect the battery negative lead.
2 Remove the air cleane ...
