Carburettor (Pierburg 2V type) - fast idle speed adjustment
1 Check the idle speed and mixture adjustment. The idle speed must be correct before attempting to check or adjust the fast idle speed.
2 With the engine at normal operating temperature, and a tachometer connected in accordance with the manufacturer’s instructions proceed as follows.
3 Remove the air cleaner.
4 Position the fast idle speed adjustment screw on the lowest (6th) step of the fast idle cam (see illustration).
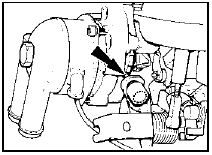
21.4 Fast idle speed adjustment - Pierburg 2V
carburettor
Screw (arrowed) should rest on lowest (6th) step of cam
5 Check that the fast idle speed is as specified. If adjustment is required, stop the engine and proceed as follows.
6 Remove the tamperproof cap from the fast idle speed adjustment screw.
7 Ensure that the adjustment screw is still resting on the lowest step of the fast idle cam, then open the throttle so that a small screwdriver can be used to adjust the screw from below the carburettor.
8 Start the engine and recheck the fast idle speed.
9 If necessary, repeat the procedure given in paragraphs 7 and 8 until the correct fast idle speed is obtained.
10 On completion of adjustment, stop the engine and disconnect the tachometer, then refit the tamperproof cap to the adjustment screw, and refit the air cleaner.
See also:
Central door locking system components - removal and refitting
General
1 On pre-1986 models the locks, with the
exception of the one on the driver’s door, are
actuated by solenoids (see illustration).
18.1 Layout of the solenoid operated central door lockin ...
Radio/cassette player - removal and refitting
Standard fixing
1 Disconnect the battery negative lead.
2 Pull off the two control knob assemblies.
3 Release the trim panel by unscrewing the
two securing nuts from the control spindles.
Remove ...
Interior lamp bulbs - renewal
1 Disconnect the battery negative lead.
Courtesy lamp
2 Remove the courtesy lamp.
3 Unclip the bulb from the lamp. On models
fitted with an overhead console and map
reading lamps, the courtesy la ...
