Carbon canister-purge solenoid (models with catalytic converter) - removal and refitting
2.0 litre DOHC models 1 The purge solenoid is located next to the carbon canister, on the right-hand side of the engine compartment.
2 Disconnect the battery negative lead.
3 Disconnect the solenoid wiring plug halves by releasing the locktabs and pulling on the plug halves, not the wiring.
4 Note the locations of the two solenoid pipes, and the orientation of the solenoid, to assist with refitting.
5 Disconnect the two pipes from the solenoid, and withdraw the solenoid from its location.
6 Refitting is a reversal of removal. Ensure that the solenoid pipes are correctly reconnected, and that the solenoid is correctly orientated, as noted before removal.
1.6 and 1.8 litre (R6A type) CVH
models
7 On 1.6 litre engines, the purge solenoid is
located to the rear of the carbon canister, on
the right-hand side of the engine
compartment. On 1.8 litre engines, the
location varies according to model and
equipment, but can be traced by following the
solenoid pipes back from the carbon canister
(see illustration).
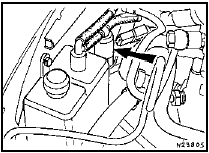
34.7 Carbon canister-purge solenoid location (arrowed) - 1.6/1.8 litre (R6A)
CVH
8 Proceed as detailed in paragraphs 2 to 6 inclusive.
See also:
Accelerator pedal - removal and refitting
Removal
1 The pedal can be removed once the throttle
cable has been disconnected from it as
described in Section 7.
2 Undo the two pedal support bracket
retaining bolts and remove the pedal.
Ref ...
Major operations possible with the engine in the car
The following work can be carried out
without having to remove the engine:
a) Cylinder head - removal and refitting.
b) Valve clearances - adjustment (see
Chapter 1).
c) Sump - removal and refitt ...
Timing belt - removal, refitting and adjustment
Removal
Note: From April 1988 (build code JG) a
modified timing belt tensioner incorporating a
larger diameter tensioner roller was
introduced, and from October 1988 an
improved timing belt was u ...
