Rocker gear - dismantling and reassembly
Dismantling 1 With the rocker assembly removed as described in Section 4, extract the split pin from one end of the rocker shaft (see illustration).
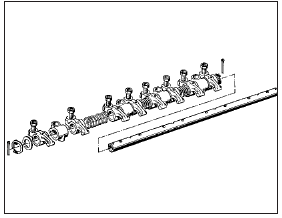
6.1 Rocker shaft assembly components
2 Take off the spring and plain washers from the end of the shaft.
3 Slide off the rocker arms, support pedestals and coil springs, keeping them in their originally fitted order. Clean out the oil holes in the shaft.
Reassembly
4 Apply engine oil to the rocker shaft before
reassembling and make sure that the flat on
the end of the shaft is to the same side as the
rocker arm adjuster screws. This is essential
for proper lubrication of the components.
See also:
Boot lid (Saloon models) - removal and refitting
Removal
1 Open the boot lid, and place protective
covers (old rags or cardboard) beneath the
corners of the lid, and over the rear wings to
prevent damage to the paintwork.
2 Where applicable, di ...
Vacuum servo unit and linkage - removal and refitting
Removal
1 Refer to Section 12 and remove the master
cylinder.
2 On fuel-injection models unclip and lift out
the front section of the heater plenum
chamber to provide access to the connecting
li ...
Interior trim panels - removal and refitting
Rear quarter trim panel
Removal
1 Unbolt the seat belt from its floor mounting.
2 Pass the belt buckle slide through the panel
aperture.
3 Pull the seat cushion and backrest forward.
4 Extract t ...
