Camshaft - removal and refitting
Carburettor engines Note: Thread locking compound will be required to coat the camshaft sprocket bolt on refitting.
Removal
1 Disconnect the battery negative lead.
2 Refer to the relevant Part of Chapter 4 and remove the air cleaner and the fuel pump.
3 Disconnect the throttle and where fitted the choke cable ends from the carburettor linkage, then undo the bolts and move the cable support bracket to one side.
4 Where applicable, refer to Chapter 5, Part B and remove the distributor.
5 Remove the timing belt cover-to-cylinder head attachment bolts.
6 Disconnect the crankcase ventilation hoses at the rocker cover, undo and remove the bolts and washers and remove the rocker cover.
7 Unscrew the securing nuts and remove the rocker arms and guides. Keep the components in their originally installed sequence by marking them with a piece of numbered tape or by using a suitably sub-divided box.
8 Withdraw the hydraulic cam followers, again keeping them in their originally fitted sequence.
9 Slacken the alternator mounting and adjuster link bolts, push the alternator in towards the engine and slip the drivebelt from the pulleys.
10 Unbolt and remove the timing belt cover (top half only on later models with two-piece cover) and turn the crankshaft to align the timing mark on the camshaft sprocket with the one on the cylinder head.
11 Slacken the bolts on the timing belt tensioner, lever the tensioner against the tension of its coil spring (if fitted) and retighten the bolts. With the belt now slack, slip it from the camshaft sprocket.
12 Pass a rod or large screwdriver through one of the holes in the camshaft sprocket to lock it and unscrew the sprocket bolt.
Remove the sprocket (see illustration).
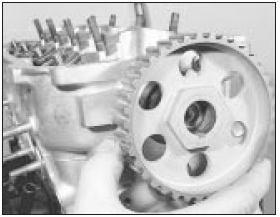
6.12 Removing the camshaft sprocket
13 Extract the two bolts and pull out the camshaft thrustplate (see illustrations).

6.13a Unscrew the camshaft thrust plate bolts . . .
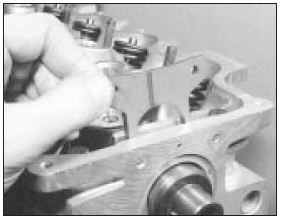
6.13b . . . and withdraw the thrust plate
14 Carefully withdraw the camshaft from the distributor end of the cylinder head (see illustration).
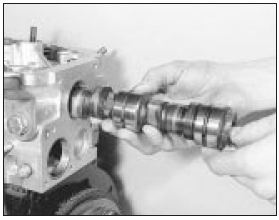
6.14 Withdrawing the camshaft
Refitting 15 Refitting the camshaft is a reversal of removal, but observe the following points.
16 Lubricate the camshaft bearings before inserting the camshaft into the cylinder head.
17 It is recommended that a new oil seal is always fitted after the camshaft has been installed (see preceding Section). Apply thread locking compound to the sprocket bolt threads.
Tighten the bolt to the specified torque.
18 Fit and tension the timing belt, as described in Section 4.
19 Oil the hydraulic cam followers with hypoid type transmission oil before inserting them into their original bores.
20 Refit the rocker arms and guides in their original sequence, use new nuts and tighten to the specified torque. It is essential that before each rocker arm is installed and its nut tightened, the respective cam follower is positioned at its lowest point (in contact with cam base circle).
Turn the camshaft (by means of the crankshaft pulley bolt) as necessary to achieve this.
21 Use a new rocker cover gasket, and to ensure that a good seal is made, check that its location groove is clear of oil, grease and any portions of the old gasket. A length of sealant should be applied to the gasket recess where the cover engages under the timing belt cover.
When in position tighten the cover retaining screws to the specified torque setting.
22 Refit the remainder of the components with reference to their relevant Chapters. Do not forget the timing belt cover bolts.
Fuel injection engines
Note: Thread locking compound will be
required to coat the camshaft sprocket bolt on
refitting.
Removal
23 Disconnect the battery negative lead.
24 Where necessary, disconnect any hoses and wiring restricting access to the timing belt cover and/or the rocker cover. If necessary, refer to the relevant Part(s) of Chapters 4 and 5 for details.
25 On XR3i and Cabriolet models with mechanical (Bosch K-Jetronic) fuel injection, disconnect the inlet air hose between the fuel distributor and throttle housing and position it out of the way.
26 On RS Turbo models disconnect the inlet air hose and the small connecting hose at the inlet air duct, then undo the two bolts and remove the air duct from the rocker cover.
27 Proceed as described in paragraphs 4 to 14 inclusive.
Refitting
28 Proceed as described in paragraphs 15 to
22 inclusive.
See also:
Oil pump - dismantling, inspection and reassembly
1.8 litre (R2A type)
1 If oil pump wear is suspected, check the
cost and availability of new parts and the cost
of a new pump. Examine the pump as
described in this Section and then decide
whethe ...
Brake fluid pipes and hoses - removal and refitting
Caution: Refer to the
precautions in Section 1.
Removal
1 To remove a flexible hose, always free it
from any mounting bracket(s) first by prising
out the U-shaped retaining clip, and then
using ...
Interior trim panels - removal and refitting
Rear quarter trim panel
Removal
1 Unbolt the seat belt from its floor mounting.
2 Pass the belt buckle slide through the panel
aperture.
3 Pull the seat cushion and backrest forward.
4 Extract t ...
