Ford VV carburettor - removal and refitting
Note: Refer to the warning at the end of Section 1 before proceeding. A new gasket must be used on refitting.
Removal
1 Disconnect the battery negative lead.
2 Remove the air cleaner (Section 2).
3 On automatic choke carburettors, if the engine is still hot, depressurise the cooling system by carefully releasing the pressure cap (see Chapter 1). Disconnect the coolant hoses from the automatic choke housing and clamp or plug them to prevent coolant loss.
4 Detach the anti-run-on valve lead at the carburettor end (see illustration).
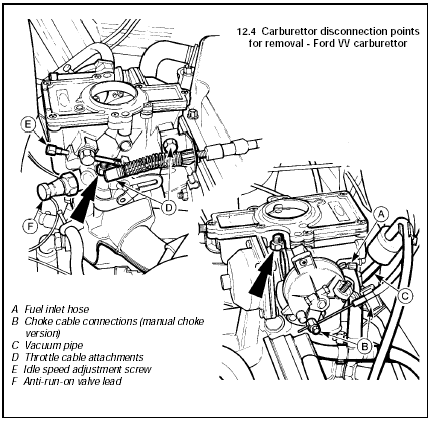
12.4 Carburettor disconnection points for removal - Ford VV carburettor
A Fuel inlet hose
B Choke cable connections (manual choke
version)
C Vacuum pipe
D Throttle cable attachments
E Idle speed adjustment screw
F Anti-run-on valve lead
5 On manual choke models disconnect the choke cable from the lever and the outer cable from its clamp on the support bracket.
6 Disconnect the distributor vacuum pipe.
7 Disconnect the throttle cable by pulling the spring clip to release the end fitting from the ball-stud and then unscrewing the cable bracket fixing bolt.
8 Disconnect and plug the fuel inlet and, where fitted, the return hose from the carburettor. If crimped type hose clips are used, cut them off and fit screw type clips at reassembly.
9 Unscrew the two carburettor mounting flange nuts and lift the carburettor from the inlet manifold. Remove the idle speed screw if necessary for access to the nuts.
Refitting
10 Refitting is a reversal of removal, but
make sure that a new flange gasket is used on
perfectly clean mating surfaces.
11 On manual choke models readjust the choke cable on reconnection, as described in Section 9.
12 When reconnecting the vacuum pipe make sure that the fuel trap is correctly positioned.
13 When refitting the fuel inlet hose ensure that it is positioned in such a way that no part of the hose is closer than 11 mm (0.4 in) to the automatic choke coolant hoses. If this is not done fuel vaporisation can occur under certain conditions.
14 On automatic choke models recheck the coolant level.
15 On completion restart the engine and check the idle speed and mixture adjustments, as given in Chapter 1.
See also:
Windscreen and fixed window glass - removal and refitting
Windscreen
Note: The average DIY mechanic is advised to
leave windscreen removal and refitting to an
expert. For the owner who insists on doing it
himself, the following paragraphs are given.
Rem ...
Battery - testing and charging
Testing
Standard and low maintenance battery
1 If the vehicle covers a small annual mileage
it is worthwhile checking the specific gravity
of the electrolyte every three months to
determine the s ...
Routine maintenance and servicing
Ford Sierra maintenance schedule
The maintenance intervals in this manual
are provided with the assumption that you will
be carrying out the work yourself. These are
the minimum maintenance interv ...
