Alternator - removal and refitting
Note: Refer to the precautions at the end of Section 1 before proceeding.
Removal
1 The operations are similar for all makes of
alternator.
2 Disconnect the battery negative terminal, then disconnect the multiplug or leads from the rear of the alternator.
3 On certain CVH engine models it may be necessary to remove the air cleaner hose, and disconnect the radiator bottom hose to give sufficient clearance to enable removal of the alternator, in which case the cooling system must be drained with reference to Chapter 1.
4 Release the mounting and adjuster link bolts, push the alternator in towards the engine and remove the drivebelt (see illustration). It may be necessary to remove the adjuster link-to-alternator bolt to facilitate removal of the drivebelt.
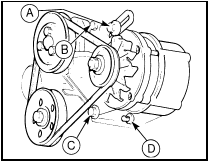
5.4 Alternator mounting and adjuster link bolts
A Adjuster link-to-alternator bolt B Adjuster link-to-engine bolt C and D Alternator mounting bolts
5 Undo and remove the mounting nuts and bolts and adjuster link bolt, if not already removed, and withdraw the alternator from the engine.
Refitting
6 Refitting is the reverse sequence to
removal, bearing in mind the following points.
a) Ensure that the mounting bolts and washers are assembled as shown (see illustrations).
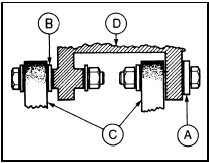
5.6a Correct fitting of alternator mounting components - early models
A Large washer
B Small washer (pre-1985 CVH engines only)
C Mounting bracket
D Alternator
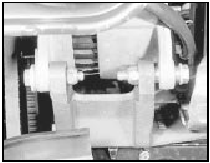
5.6b Alternator mounting bolt arrangement - later models
b) Adjust the drivebelt tension as described in Chapter 1.
c) On completion, where applicable, refill the cooling system as described in Chapter 1.
See also:
Carburettor (Weber 2V type) - fast idle speed adjustment
1 This procedure does not apply to models
fitted with a carburettor stepper motor, for
which no adjustment is possible.
2 Check the idle speed and mixture. The idle
speed must be correct before at ...
Specifications
General
System type:
1.1 litre OHV engines . . . . . . . . . . . . . . . . . . . . . . . . . . . . .
. . . . . . . . Mechanical contact breaker and coil
1.1 litre CVH engines up to 1986 . . . . . ...
Examination and renovation
Crankshaft, bearings, cylinder
bores and pistons
1 Refer to Section 13 in Part A of this Chapter.
The information applies equally to the CVH
engine, except that standard sized crankshafts
are unm ...
