Tailgate - removal and refitting
Removal
1 Remove the trim panel (Section 32).
2 Disconnect the wiring from the heated rear window element, radio aerial, wiper motor tailgate speakers and tailgate lock motor as applicable (see illustration).
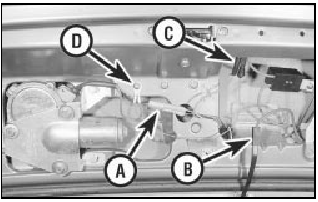
15.2 Electrical connections at the tailgate (1986 model shown)
A Wiper motor
B Radio aerial connection
C Feed and relay connectors
D Earthing point
3 Tie a strong cord to the end of each separate wiring loom. Pull out the flexible grommets and withdraw the wiring looms until the cords appear. Untie the looms, leaving the cords in the tailgate.
4 Repeat this procedure for the washer supply pipe.
5 With an assistant supporting the tailgate, prise off the stout clips or release the pegs and disconnect the support struts from the tailgate (see illustration).
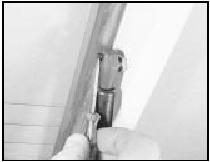
15.5 Releasing tailgate strut retaining clip
6 From the top edge of the tailgate aperture, remove the weatherstrip. Release the headlining clips from the flange.
7 Undo the screws and remove the pillar trim on each side, then pull the headlining down for access to the hinge bolts.
8 With the tailgate supported, undo the nuts from the hinge bolts and remove the tailgate.
Refitting
9 Refitting is a reversal of removal. Adjust the
position of the tailgate in the aperture at the
hinge bolts and the closing action at the
striker plate.
See also:
Rear suspension front mounting (Saloon, Hatchback and Estate models) -
renewal
1 Chock the front wheels, jack up the rear of
the vehicle and support on axle stands placed
under the side members.
2 Unscrew and remove the three bolts
securing the relevant front guide plate to ...
Bumper components - removal and refitting
Bumper overriders
Removal
1 On pre-1986 models the overrider is held to
the bumper by a clamp screw. Find this screw
on the underside of the bumper and release it
- the overrider can then be with ...
Fuel distributor - removal and refitting
Note: Refer to the precautions at the end of
Section 1 before proceeding. It is important to
note that each injection supply pipe connection
in the distributor head has a screw adjacent to
it. The ...
