Auxiliary shaft - removal, inspection and refitting
Note: A new gasket should be used when refitting the auxiliary shaft cover (see text).
Removal
1 Remove the timing belt and the auxiliary
shaft sprocket.
2 Remove the distributor.
3 Remove the mechanical fuel pump and operating pushrod (where applicable).
4 Unscrew the three securing bolts and remove the auxiliary shaft cover (see illustration).
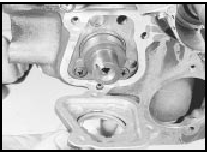
25.4 Unscrew the auxiliary shaft cover securing bolts and remove the cover
5 Unscrew the cross-head screws, using an impact screwdriver if necessary, remove the thrustplate and withdraw the auxiliary shaft from the cylinder block (see illustrations).
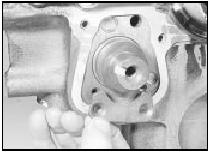
25.5a Unscrew the auxiliary shaft thrustplate securing screws and remove the
thrustplate
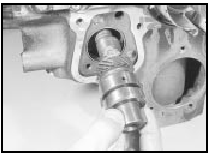
25.5b Withdraw the auxiliary shaft
6 Cut the cover gasket along the top of the crankshaft front oil seal housing and scrape off the gasket.
Inspection
7 Examine the shaft for wear and damage,
and renew it if necessary.
8 If desired, the oil seal in the cover can be renewed as follows.
9 Support the cover on blocks of wood and drive out the old oil seal. Drive the new seal into place using a suitable metal tube or socket (see illustrations).
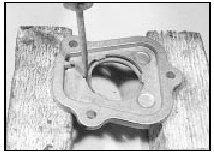
25.9a Driving out the auxiliary shaft cover oil seal

25.9b Using a socket to fit a new auxiliary shaft cover oil seal
The sealing lip
must face towards the cylinder block. Smear
the sealing lip with clean engine oil before
installation.
Refitting
10 Commence refitting by lubricating the
auxiliary shaft journals with clean engine oil,
then insert the shaft into the cylinder block.
11 Locate the thrustplate in the shaft groove, then insert the crosshead screws and tighten them with an impact screwdriver.
12 Using a dial test indicator (if available), or feeler blades, check that the auxiliary shaft endfloat is within the limits given in the Specifications. If not, renew the thrustplate and re-check. If this does not bring the endfloat within limits, the auxiliary shaft must be renewed.
13 Cut out the relevant section of a new gasket, and locate it on the cylinder block, then refit the auxiliary shaft cover and tighten the securing bolts.
14 Where applicable, refit the fuel pump.
15 Refit the distributor.
16 Refit the auxiliary shaft sprocket and the timing belt.
See also:
Temperature gauge sender unit - removal and refitting
Note: Suitable jointing compound will be
required on refitting.
Removal
1 With the engine cold unscrew the pressure
cap on the thermostat housing or expansion
tank as applicable, then refit it. T ...
Sump - removal and refitting
Note: New gaskets and sealing strips will be
required for refitting, and sealing compound
will be required to coat the gasket faces.
Removal
1 If the engine is in the vehicle, proceed as
follows, ...
Locks and Security
KEYS
The key operates all locks on your vehicle. In case of loss, replacement
keys are available from your dealer.
You should always carry a second key with you in a safe place in case
you requi ...
