Facia - removal and refitting
Pre-1986 models
Removal
1 Disconnect the battery negative lead.
2 Remove the under-dash cover panels.
3 Refer to Chapter 10 and remove the steering column assembly.
4 Refer to Chapter 12 and remove the instrument panel.
5 Where applicable, refer to Chapter 12 and remove the warning indicator control unit the auxiliary warning system, and where fitted, the fuel computer.
6 Detach the heater controls, switches and wiring multi-plugs, with reference to Chapter 7 Remove the ashtray and cigar lighter mounting panel.
8 Remove the radio and its mounting bracket (Chapter 12).
9 Disconnect the wire from the loudspeaker and remove the speaker (four screws).
10 Remove the glove compartment (Section 31).
11 Where fitted, remove the choke cable (Chapter 4).
12 Detach the vent ducts and demister hoses from the heater.
13 Extract the securing screws and clips and remove the facia panel complete with crash pad (see illustrations).

33.13a Crash pad and facia attachments - pre-1986 Base and L models
A Clip
B Screw
C Nut
D Screw
E Screw
E1 Screw (L models)
F Screw
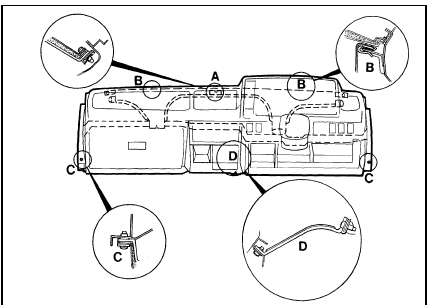
33.13b Crash pad and facia attachments - pre-1986 GL and Ghia models
A Screw B Clip C Screw D Screw
14 The crash padding can be detached by removing the glove compartment mounting bracket and lock bracket, withdrawing the side and centre face level vents and extracting all the securing clips.
Refitting
15 Refitting is a reversal of removal.
1986 models onwards
Removal
16 Disconnect the battery negative lead.
17 Refer to Chapter 10 and remove the steering column assembly.
18 Refer to Chapter 12 and remove the instrument panel.
19 Where applicable, refer to Chapter 12 and remove the warning indicator control unit of the auxiliary warning system and where fitted, the fuel computer.
20 Remove the choke cable, where fitted, as described in Chapter 4.
21 Remove the heater control knobs.
22 Undo the two heater control facia panel screws, pull the panel out and disconnect the wiring multi-plug. Remove the panel.
23 Remove the ashtray.
24 Refer to Chapter 12 and remove the radio or radio/cassette player.
25 Undo the radio/ashtray facia panel screws, withdraw the panel and disconnect the cigar lighter wiring, if fitted. Remove the panel.
26 Remove the glove compartment as described in Section 31.
27 Undo the nine screws and one nut securing the facia, then remove the unit from the car (see illustration).
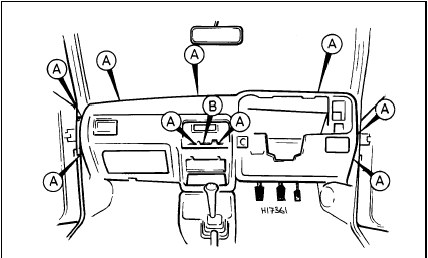
33.27 Crash pad and facia attachments - 1986 models onwards
A Retaining screws B Retaining nuts
28 The crash padding can be removed after undoing the screws from behind the facia.
Refitting
29 Refitting is a reversal of removal.
See also:
Fuel and exhaust systems - fuel injection
General information and precautions
General information
2.0 litre SOHC models
The fuel injection system fitted to these
models is of the Bosch L-Jetronic type. The
system is under the overall con ...
Headlamps - alignment
1 It is recommended that the headlamp
alignment is carried out by a Ford dealer using
specialist beam setting equipment. However,
in an emergency the following procedure will
provide an acceptable ...
Camshaft and cam followers - removal, inspection and refitting
Note: A new camshaft oil seal should be used
when refitting the camshaft.
Removal
1 Remove the cylinder head.
2 Hold the camshaft stationary using a
suitable spanner on the cast boss behind the
...
