Radio/cassette player and graphic equaliser - removal and refitting
Note: The information in this Section applies to Ford original equipment fitment components.
Radio
Early models
Removal
1 Disconnect the battery.
2 Pull off the control knobs, the tuning knob spacer and the tone control lever. Remove the cover panel.
3 Extract the four fixing screws from the front of the radio.
4 Pull the radio far enough from the facia to be able to disconnect the aerial, power supply and earth leads and the speaker wires.
5 Unscrew the two nuts which hold the receiver to the mounting plate. Remove the mounting plate.
6 Take off the rear support bracket and locating plate.
Refitting
7 Refitting is a reversal of removal.
Later models
Removal
8 Disconnect the battery.
9 Remove the radio control knobs and withdraw the tuning knob spacer and the tone control lever.
10 Unscrew and remove the facia plate retaining nuts and washers, then withdraw the facia plate.
11 The radio retaining tangs can now be pulled inwards (towards the centre of the radio) and the radio withdrawn from its aperture. You may need to make a hook-ended rod (welding rod is ideal) to pull the tangs inwards to release the radio (see illustration).
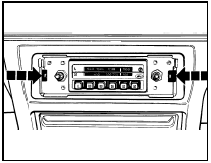
21.11 Later type radio retaining tang locations
12 With the radio withdrawn, disconnect the power lead, the speaker plug, earth lead, the aerial cable and feed.
13 From the rear of the radio remove the plastic support bracket and locating plate, then remove the radio from the front bracket.
Refitting
14 Refitting is the reversal of the removal
procedure.
Radio/cassette player
Early models
15 Proceed as described previously in this
Section for the radio fitted to early models.
Later models
Removal
16 Disconnect the battery.
17 To withdraw the radio/cassette unit from its aperture you will need to fabricate the Ushaped extractor tools from wire rod of suitable gauge to insert into the withdrawal slots on each side of the unit (in the front face) (see illustration).

21.17 Radio/cassette player extractor tool
18 Insert the withdrawal tools as shown then, pushing each outwards simultaneously, pull them evenly to withdraw the radio/cassette unit (see illustration). It is important that an equal pressure is applied to each tool as the unit is withdrawn.
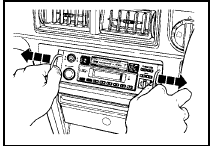
21.18 Radio/cassette player removal using the extractor tools
19 Once withdrawn from its aperture disconnect the aerial cable, the power lead, the aerial feed, the speaker plugs, the earth lead and the light and memory feed (where applicable).
20 Push the retaining clips inwards to remove the removal tool from each side (see illustration).
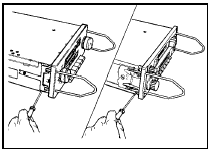
21.20 Releasing the extractor tool after removal
Refitting 21 Refit in the reverse order of removal. The withdrawal tools do not have to be used, simply push the unit into its aperture until the securing clips engage in their slots.
Graphic equaliser
22 The procedure is the same as for the
radio/cassette player as fitted to later models
and described previously in this Section.
See also:
General information
OHV engines
The 1.1 litre and 1.3 litre OHV engines are
of four-cylinder, in-line overhead valve type
(hence OHV), mounted transversely together
with the transmission, at the front of the car.
Th ...
Exhaust manifold - removal and refitting
Removal
1 Disconnect the battery negative lead.
2 Remove the air cleaner and pull the hot air
pick-up pipe from the exhaust manifold hot air
shroud.
3 Remove the securing screws (1 screw on
DOHC ...
Camshafts and cam followers - removal, inspection and refitting
Note: Once the timing chain has been
removed from the camshaft sprockets, do not
turn the crankshaft until the timing chain has
been correctly refitted - this is to prevent
contact between the val ...
