Sump - removal and refitting
Note: A new gasket and new sump bolts must be used when refitting, and suitable sealant will be required (available from a Ford dealer). Note that it is preferable to keep the engine upright until the sump has been removed to prevent sludge from entering the engine internals.
1.8 litre (R2A type)
Removal
1 With the engine removed, proceed as
follows.
2 Remove the flywheel/driveplate and the engine adapter plate.
3 Unscrew the fourteen securing bolts and withdraw the two reinforcing strips and the sump. If the sump is stuck, carefully tap it sideways to free it. Do not prise between the mating faces.
4 Recover the gasket.
5 Thoroughly clean the mating faces of the cylinder block and sump.
Refitting
6 Commence refitting by applying sealing
compound (available from a Ford dealer) to
the cylinder block, oil pump housing and
crankshaft rear oil seal housing mating faces
at the points shown (see illustration).
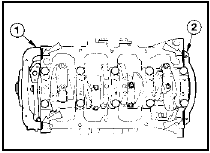
27.6 Apply sealing compound to the areas shown before fitting the sump gasket
- 1.8 litre (R2A)
Note that the sump must be fitted within ten minutes of applying the sealing compound.
7 Fit a new gasket, ensuring that it engages correctly in the grooves in the crankshaft rear oil seal carrier and the oil pump housing (see illustration).
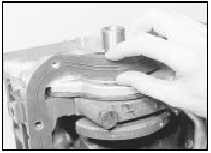
27.7 Ensure that the gasket locates correctly on the oil pump housing - 1.8
litre (R2A)
8 Locate the sump on the gasket and loosely fit the securing bolts.
9 Tighten all the bolts slightly to obtain a light and even gasket preload.
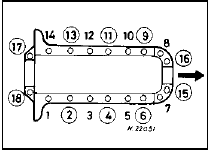
10 Tighten the bolts to the specified torque in the sequence shown (see illustration).
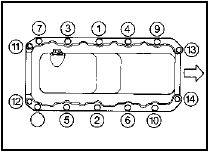
27.10 Sump bolt tightening sequence - 1.8 litre (R2A)
Note
that the ten M8 bolts and the four M6 bolts
are tightened to different torques.
11 Refit the engine adapter plate and the flywheel/driveplate.
1.6 and 1.8 litre (R6A type) Note: The following procedure applies to the 1.6 litre CVH engine. For the 1.8 litre (R6A type) engine, proceed as described above for the 1.8 litre (R2A type).
Removal
12 Sump removal and refitting is easier if the
engine is removed from the vehicle. However,
if the engine is in the vehicle, proceed as
follows. If the engine has been removed from
the vehicle, proceed to paragraph 15.
13 Remove the clutch.
14 Drain the engine oil into a suitable container.
15 Remove the flywheel and the engine adapter plate.
16 Unscrew the eighteen securing bolts and withdraw the sump. If the sump is stuck, carefully tap it sideways to free it. Do not prise between the mating faces. Recover the gasket.
17 Thoroughly clean the mating faces of the cylinder block and sump.
Refitting
18 Apply sealing compound to the joints
between the oil pump and the cylinder block,
and the crankshaft rear oil seal housing and
the cylinder block, as shown (see
illustration).
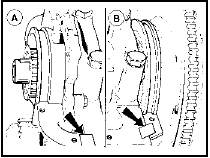
27.18 Apply sealing compound at the points arrowed before refitting the sump
- 1.6 litre
A Oil pump/cylinder block joint B Crankshaft rear oil seal housing/cylinder block joint
19 Without applying any further sealer, locate the gasket into the grooves of the oil pump and the rear oil seal housing. To hold the gasket in position, studs can be inserted temporarily in the bolt hole positions circled in the illustration indicating the bolt tightening sequence. Make sure that the gasket spacing pips are seated correctly.
20 Locate the sump on the gasket, taking care not to displace the gasket, then loosely fit the securing bolts. With the sump in position, where applicable remove the studs from the bolt holes, and loosely fit the remaining securing bolts.
21 Tighten the bolts to the torque given in the Specifications at the beginning of this Chapter, in two stages, and in the sequence shown (see illustration).
27.21 Sump bolt tightening sequence - 1.6 litre
Arrow indicates front of engine
22 Refit the engine adapter plate and the flywheel.
23 If the engine is in the vehicle, refit the clutch. Refill the engine with oil.
See also:
Choke control cable - removal, refitting and adjustment
Pre-1986 models
Removal
1 Disconnect the battery earth lead.
2 For improved access, remove the air
cleaner unit (Section 2).
3 At the carburettor end of the cable, loosen
the cable clamp bolt, d ...
Aerial - removal and refitting
Manually-operated type - all
models except Cabriolet
Removal
1 Withdraw the radio (Section 21) until the
aerial lead can be pulled out of the receiver
socket.
2 Working under the front wing, rel ...
Central Fuel Injection (CFI) unit - removal and refitting
Note: Refer to the precautions at the end of
Section 1 before proceeding.
Removal
1 Disconnect the battery negative lead.
2 Remove the air cleaner assembly.
3 Depressurise the fuel system as desc ...
