Fuel pump - removal and refitting
Caution: Refer to the precautions in Section 1 before proceeding.
Mechanical pump
Note: A new gasket must be used when
refitting the pump.
1 Disconnect the battery negative lead.
2 For improved access on CVH models, remove the air cleaner.
3 Identify the hose locations as an aid to refitting, then disconnect the hoses from the pump and plug them.
4 Remove the two securing bolts and withdraw the pump from the cylinder block or cylinder head, as applicable (see illustration).
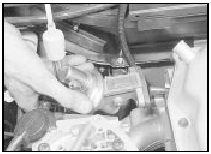
8.4 Withdrawing the fuel pump from the cylinder head - CVH model
5 Recover the gasket, and if desired remove the operating pushrod (see illustration).
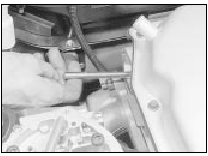
8.5 Withdrawing the fuel pump operating pushrod - CVH model
6 Clean the exterior of the pump with paraffin and wipe dry. Clean all traces of gasket from the pump flange and the cylinder block or cylinder head, as applicable.
7 On early pumps with a removable top cover, remove the securing screw and withdraw the cover and the nylon mesh filter with seal (see illustration). Clean the filter, the cover and the pump with petrol. Locate the filter in the cover and fit the cover to the pump, so that the indentations on the cover and pump are aligned. Tighten the cover securing screw.
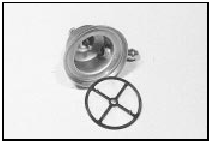
8.7 Removing the top cover from an early type fuel pump for access to the
mesh filter
8 Refitting is a reversal of removal, but fit a new gasket, and tighten the securing bolts to the specified torque. Ensure that the hoses are correctly connected, and if the hoses were originally secured with crimped type clips, discard these and use new worm drive clips.
Electric pump
SOHC and CVH models with air
conditioning
9 Disconnect the battery negative lead.
10 Chock the front wheels, then jack up the rear of the vehicle and support on axle stands.
(see “Jacking and Vehicle Support”).
11 Clean the area around the pump mounting, and position a suitable container under the pump.
12 Using a hose clamping tool or self-locking pliers, clamp the fuel tank-to pump hose to prevent excessive petrol spillage, or alternatively make arrangements to collect the contents of the fuel tank which will otherwise be released. Disconnect the hose from the pump.
13 Disconnect the fuel outlet hose from the pump and plug the hose to prevent petrol spillage.
Caution: Petrol under pressure may spray out of the outlet as the hose is disconnected.
14 Disconnect the wiring plug from the pump.
15 Slacken the clamping bolt, and slide the pump from the bracket assembly.
16 Refitting is a reversal of removal, but make sure that the rubber sleeve is correctly located around the pump body in the bracket, and ensure that the fuel hoses are securely connected. If the hoses were originally secured with crimped type clips, discard these and use new worm drive clips.
2.0 litre DOHC models
17 On these models the fuel pump is
mounted in the fuel tank, on the same
mounting as the fuel level sender unit (see
illustration).
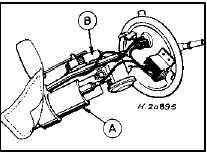
8.17 Combined fuel pump/fuel level sender unit - 1.6/1.8 litre (R6A) CVH
models
A Fuel pump B Fuel level sender unit
18 To remove the pump, first remove the fuel tank.
19 Unscrew the fuel pump/fuel level sender unit by engaging two crossed screwdrivers in the slots on either side of the unit mounting flange. Recover the seal.
20 Refitting is a reversal of removal. It is necessary to fit a new seal.
See also:
Air cleaner inlet air temperature control check (Every 24 000 miles (40 000
km) or 2 years)
SOHC and DOHC carburettor
models
1 A vacuum pump will be required to test the
control components.
2 To check the operation of the air
temperature control, the engine must be cold.
First observe ...
Steering column lock - removal and refitting
Note: For ignition switch removal see
Chapter 5. A new shear-bolt will be
required on refitting.
Removal
1 To remove the ignition switch/column lock,
the shear-head bolt must be drilled out.
2 A ...
Engine/automatic transmission assembly - reconnection and refitting
1 Reverse the removal procedure described
in Section 12, noting the following points.
2 Check that the engine adapter plate is
correctly positioned on its locating dowels.
3 As the torque converte ...
