Load apportioning valve P100 models) - removal and refitting
Caution: Refer to the precautions in Section 1.
Removal
1 Chock the front wheels, jack up the rear of
the vehicle and support on axle stands (see
“Jacking and Vehicle Support”).
2 The load apportioning valve is located on the right-hand side of the vehicle underbody above the axle.
3 Remove the spring clip and clevis pin, and detach the spring from the valve operating lever (see illustration).
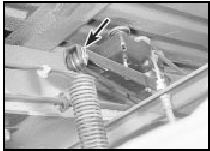
24.3 Remove the spring clip (arrowed) and clevis pin from the valve operating
lever
4 Place a suitable container beneath the valve to catch spilt fluid, then unscrew the union nuts and disconnect the fluid pipes.
Plug the open ends of the pipes and valve to prevent fluid leakage and dirt ingress.
5 Unscrew the three securing nuts and bolts from the valve mounting bracket, and remove the valve assembly (see illustration).
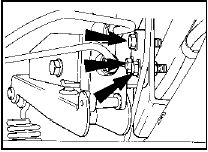
24.5 Load apportioning valve securing bolts (arrowed)
Refitting
6 Refitting is a reversal of removal, but note
that the fluid inlet pipe from the master cylinder
must be connected to the lower valve port, and
the fluid outlet pipe to the rear brakes must be
connected to the upper valve port.
7 On completion, bleed the rear hydraulic circuit and check the valve adjustment.
See also:
Rocker gear - dismantling and reassembly
Dismantling
1 With the rocker assembly removed as
described in Section 4, extract the split pin
from one end of the rocker shaft (see
illustration).
6.1 Rocker shaft assembly components
2 Take ...
Fluid leak check (Every 6000 miles (10 000 km) or 6 months)
1 Visually inspect the engine joint faces,
gaskets and seals for any signs of water or oil
leaks. Pay particular attention to the areas
around the rocker cover, cylinder head, oil
filter and sump ...
Ignition timing (OHC models) - adjustment
Note: During production the ignition timing is
accurately set using a microwave process,
and sealant is applied to the distributor clamp
bolt. Because the electronic components
require no maintena ...
