Tailgate/boot lid/fuel filler flap release cable - removal and refitting
Removal
1 Operate the control lever to open the
tailgate/boot lid and the fuel filler flap (see
illustration).
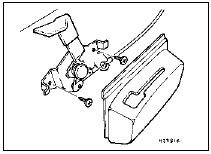
14.1 Tailgate/boot lid/fuel filler flap control lever assembly
2 Remove the driver’s side centre pillar lower trim panel and the sill trim panel.
3 Withdraw the cover from the control lever.
4 Unscrew the two securing bolts, and detach the control lever assembly from the body panel. Detach the cable from the control assembly.
5 Fold the rear seat cushion forwards or remove it, as applicable, and remove the rear seat side cushion for access to the wheel arch trim panel.
6 Detach the trim panel from the wheel arch by removing the two securing screws from the parcel shelf bracket. Free the cable up to the wheel arch.
7 Working inside the luggage compartment, remove the trim panels for access to the petrol flap lock and tailgate/boot lid lock.
8 Disengage the petrol flap catch from the housing by twisting and pulling out (see illustration). Carefully pull the cable through into the luggage compartment, noting its routing.
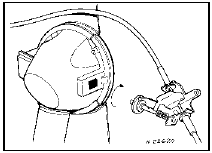
14.8 Disengaging the petrol flap catch from the housing
9 Remove the securing screws, and withdraw the tailgate/boot lid lock striker from the body panel. Withdraw the striker and cable assembly.
Refitting
10 Commence refitting by installing the
tailgate/boot lid striker and cable assembly.
Secure the cable to the body with tape.
11 Route the cable back to the petrol flap housing, and refit the petrol flap catch.
12 Route the cable into the interior of the vehicle, and refit the luggage compartment trim panels.
13 Route the cable to the control lever, securing the cable with tape to the body, then refit the wheel arch trim panel, and refit the seat cushions.
14 Reconnect the cable to the control lever assembly, then refit the assembly.
15 Refit the control lever cover and the trim panels.
Tailgate/boot lid spoiler - removal and refitting
Models up to 1990
1 Open the tailgate/boot lid.
2 Prise the four screw covers from the spoiler, then remove the screws, and withdraw the spoiler.
3 Refitting is a reversal of removal.
Models from 1990
4 Open the tailgate/boot lid.
5 Remove the inner tailgate/boot lid trim panel for access to the spoiler securing nuts.
6 Unscrew the central spoiler securing nut, then unscrew the four outer securing nuts (two on each side), and withdraw the spoiler.
7 Refitting is a reversal of removal.
See also:
Sunroof - removal, refitting and adjustment
Glass panel - removal and
refitting
1 Open the sunblind and remove the three
screws and clips shown (see illustration)
then slide the lower frame rearwards into the
roof.
39.1 Sunroof lower fr ...
Fuel and exhaust systems - carburettor
General information and precautions
General information
The fuel system on carburettor models
may comprise a fuel tank, a fuel pump, a fuel
pressure regulator and/or vapour separator, a
downdraug ...
Rear shock absorber - removal and refitting
Saloon and Hatchback models
1 With the weight of the vehicle resting on the
roadwheels, work under the vehicle to
unscrew and remove the shock absorber
lower mounting bolt and nut from the relevan ...
