Facia panel switches - removal and refitting
1 Disconnect the battery negative lead.
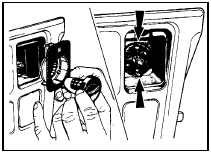
Rocker switches and push button
switches
2 Using a thin-bladed screwdriver, carefully
prise the switch from the facia panel.
3 Disconnect the wiring plug and withdraw the switch.
4 Refitting is a reversal of removal.
Instrument panel illumination and intermittent wipe rheostats 5 Proceed as described in paragraphs 2 to 4.
Heater blower switch
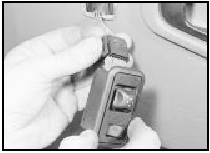
6 Carefully pull off the switch knob, using
pliers with padded jaws if necessary.
7 Using a thin-bladed screwdriver, prise out the switch front plate from the facia panel.
8 Squeeze the switch retaining tabs, then withdraw the switch and disconnect the wiring plug (see illustration).
9.8 Heater blower switch removal. Switch retaining tabs arrowed
9 Refitting is a reversal of removal.
Loudspeaker balance joystick 10 Using a thin-bladed screwdriver, carefully prise the joystick front plate from the facia panel.
11 Twist the joystick assembly retaining ring anti-clockwise and remove the ring.
12 Working behind the facia panel, disconnect the wiring plug and slide out the joystick assembly.
13 Refitting is a reversal of removal, but note that the wiring plug can only be fitted in one position, and ensure that the joystick assembly locating lug engages in the corresponding hole in the facia panel.
Electric door mirror switch - removal and refitting
1 Disconnect the battery negative lead.
Models up to 1987
2 Using a thin-bladed screwdriver, carefully
prise the switch from the door trim panel.
3 Disconnect the wiring plug and withdraw the switch (see illustration).
10.3 Disconnect the wiring plug from the door mirror switch - models up to
1987
4 Refitting is a reversal of removal.
Models from 1987
5 Prise the securing screw cover from the
mirror control panel, then remove the screw
and withdraw the control panel.
6 Depress the switch retaining tang, then withdraw the switch from the control panel and disconnect the wiring plug.
7 Refitting is a reversal of removal.
See also:
Seats - removal and refitting
Front seat
Removal
1 Slide the seat as far forward as it will go.
2 Unscrew and remove the bolts which retain
the rear of the seat slides to the floor pan.
3 Slide the seat as far to the rear as ...
Headlining - removal and refitting
Saloon, Hatchback and Estate
models
1 On Saloons, remove the rear seat back.
2 Loosen the upper screws of all the pillar
trim panels touching the headlining.
3 Prise off the covers and remove the ...
Automatic transmission fluid level check (Every 12 000 miles (20 000 km) or
12 months)
1 Fluid level should be checked with the
transmission at operating temperature (after a
run) and with the vehicle parked on level
ground.
2 Open and prop the bonnet. With the engine
idling and th ...
