Automatic transmission fluid level check (Every 12 000 miles (20 000 km) or 12 months)
1 Fluid level should be checked with the transmission at operating temperature (after a run) and with the vehicle parked on level ground.
2 Open and prop the bonnet. With the engine idling and the handbrake and footbrake applied, move the gear selector through all positions three times, finishing up in position “P”, 3 Wait one minute. With the engine still idling, withdraw the transmission dipstick (see illustration).
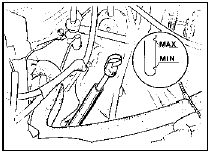
17.3 Automatic transmission dipstick location and markings
Wipe the dipstick with a clean lint-free rag, re-insert it fully and withdraw it again. Read the fluid level at the end of the dipstick: it should be between the two notches.
4 If topping-up is necessary, do so via the dipstick tube, using clean transmission fluid of the specified type (see illustration). Do not overfill.
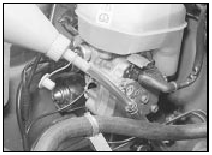
17.4 Topping-up the transmission fluid
5 Stop the engine, refit the dipstick and close the bonnet.
6 Note that if the fluid level was below the minimum mark when checked or is in constant need of topping-up, check around the transmission for any signs of excessive fluid leaks.If present, leaks must be rectified without delay.
7 If the colour of the fluid is dark brown or black this denotes the sign of a worn brake band or transmission clutches, in which case have your Ford dealer check the transmission at the earliest opportunity.
See also:
Throttle body - removal and refitting
Note: A tachometer and an exhaust gas
analyser will be required to check the idle
mixture on completion. A new gasket must be
used when refitting the throttle body.
2.0 litre SOHC models
1 Discon ...
Contact breaker points renewal (Every 12 000 miles or 12
months)
1 Spring back the retaining clips or undo the
screws as appropriate and lift off the
distributor cap.
2 Withdraw the rotor arm from the distributor
shaft.
3 On the Bosch distributor disconnect th ...
Rear suspension lower arm (Saloon, Hatchback and Estate models) - removal
and refitting
Models with rear drum brakes
Removal
1 Chock the front wheels, jack up the rear of
the vehicle and support on axle stands placed
under the side members.
2 Remove the relevant driveshaft.
3 Remov ...
