Washer nozzles - removal and refitting
Windscreen and rear window
washers
1 To remove a nozzle, carefully prise it from
its location using a thin-bladed screwdriver.
Disconnect the washer hose and withdraw the nozzle.
2 To refit, reconnect the washer hose to the nozzle, and push the nozzle into its locating hole.
3 The nozzles can be adjusted by inserting a pin into the jet and swivelling to the required position.
Headlamp washers
Models up to 1987
4 Remove the radiator grille panel.
5 Disconnect the washer hose from the nozzle.
6 Separate the upper and lower halves of the nozzle by prising apart with a thin-bladed screwdriver, then withdraw the nozzle halves.
7 Refitting is a reversal of removal.
8 The nozzles can be adjusted as described in paragraph 3.
Models from 1987
9 Disconnect the washer hose from the
nozzle on the end of the wiper arm.
10 Prise the combined wiper blade mounting and nozzle from the wiper arm using a thinbladed screwdriver or a pair of pliers.
11 Refitting is a reversal of removal.
12 Note that the nozzles are not adjustable.
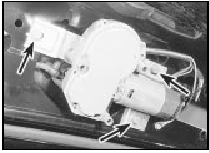
Windscreen wiper motor and linkage - removal and refitting
Removal
1 Disconnect the battery negative lead.
2 Remove the wiper arms.
3 Remove the windscreen cowl panel.
4 Disconnect the wiring plug from the motor.
5 Remove the seven securing screws, and withdraw the mounting bracket together with the linkage and motor (see illustration).

34.5 Windscreen wiper motor bracket securing screws (arrowed)
6 Unscrew the nut securing the link arm to the motor shaft, then remove the three securing bolts, and withdraw the motor from the mounting bracket.
Refitting
7 Refitting is a reversal of removal.
Windscreen/headlamp washer pump - removal and refitting
Removal
1 Where headlamp washers are fitted, a
separate pump is used. The pump(s) is/are a
push-fit in the base of the washer fluid
reservoir (see illustration).

35.1 Windscreen washer pump - models from 1987
2 Disconnect the battery negative lead.
3 To remove a pump, syphon out the contents of the reservoir, then pull the pump from its grommet.
4 Disconnect the wiring plug and the washer hose.
Refitting
5 Refitting is a reversal of removal, using a
new grommet if necessary. Use a little liquid
detergent as a lubricant.
6 On completion, refill the reservoir and check for correct operation.
Windscreen/headlamp washer fluid reservoir - removal and refitting
1 Where headlamp washers are fitted, a combined windscreen/headlamp washer fluid reservoir is used. On models up to 1987, the reservoir is mounted on the right-hand side of the engine compartment. On models from 1987, the reservoir is mounted under the right-hand front wing, but has a filler within the engine compartment.
2 Disconnect the battery negative lead.
Models up to 1987
3 Syphon out the contents of the reservoir, and
disconnect the wiring plug(s) and washer hose(s).
4 Remove the two or three reservoir retaining screws, as applicable, then withdraw the reservoir.
5 Refitting is a reversal of removal.
Models from 1987
6 Proceed as described in paragraph 3.
7 Working under the front wing, remove the three reservoir securing screws and pull the reservoir down slightly. On vehicles fitted with front foglamps, the bumper must be removed.
8 Withdraw the reservoir.
9 Refitting is a reversal of removal.
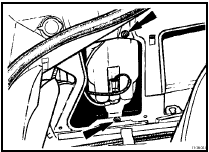
Rear window wiper motor - removal and refitting
Hatchback models
1 Disconnect the battery negative lead.
2 Remove the wiper arm.
3 Open the tailgate; remove the trim panel.
4 Unscrew the earth lead and disconnect the wiring plug from the motor.
5 Remove the three securing bolts and withdraw the mounting bracket and motor from the tailgate (see illustration).
37.5 Rear window wiper motor location - mounting bracket securing bolts
arrowed
6 The motor can be separated from the mounting bracket by removing the three securing bolts.
7 Refitting is a reversal of removal.
Estate models
8 The procedure is as described for
Hatchback models except that the washer
hose must be disconnected from the motor
assembly, and the mounting bracket is
secured by four bolts.
Rear window washer pump - removal and refitting
The procedure is as described for the windscreen/headlamp washer pump.
Rear window washer fluid reservoir - removal and refitting
Removal
1 On models from 1987, the rear window
washer circuit shares the same reservoir as
the windscreen/headlamp washers.
2 On models up to 1987, the reservoir is located behind the trim panel on the left-hand side of the luggage compartment (see illustration). To remove the reservoir proceed as follows.
39.2 Rear window washer fluid reservoir location - Hatchback models up to
1987. Securing screws arrowed
3 Disconnect the battery negative lead.
4 Remove the trim panel.
5 Operate the washers to reduce the fluid level in the reservoir.
6 Remove the reservoir filler cap, and disconnect the wiring plug and water hose.
7 Remove the two securing screws and withdraw the reservoir.
Refitting
8 Refitting is a reversal of removal.
See also:
Cylinder head - removal and refitting (engine in vehicle)
Note: Refer to the warning at the beginning of
Section 5 and the note at the beginning of the
following Section before proceeding. The
cylinder head must not be removed when the
engine is warm.
R ...
Thermo-viscous cooling fan (SOHC models) - removal and refitting
Removal
1 Disconnect the battery negative lead.
2 Remove the four retaining clips and
unscrew the two retaining screws, then
withdraw the upper section of the fan shroud
(see illustrations).
1 ...
Trip computer components - removal and refitting
1 Disconnect the battery negative lead
Computer module
2 Remove the single screw from the top edge
of the facia panel in which the module is
housed, then withdraw the facia panel.
3 Remove the fo ...
