
Rear lamp unit - removal and refitting
1 Disconnect the battery negative lead.
Saloon and Hatchback models 2 Working inside the luggage compartment, press the plastic retaining tab and remove the bulbholder assembly.
3 Disconnect the wiring plug from the bulbholder.
4 Unscrew the securing nuts, and withdraw the rear lamp unit from outside the vehicle.
Recover the gasket.
5 Refitting is a reversal of removal.
Estate models
6 Working inside the luggage compartment,
turn the retaining tabs a quarter-turn and
remove the rear side trim panel cover.
7 Push out the retaining tabs and withdraw the bulbholder.
8 Disconnect the wiring plug from the bulbholder.
9 Unscrew the four securing nuts, and withdraw the rear lamp unit from outside the vehicle. Recover the gasket.
10 Refitting is a reversal of removal.
P100 models
11 Remove the two securing screws and
detach the rear lamp wiring cover from the
side of the cargo area (see illustration).
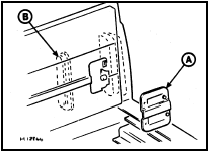
43.11 Rear lamp wiring cover (A) and rear lamp cover (B) - P100 models
12 Working through the cargo area aperture, unscrew the two wing nuts and remove the rear lamp cover.
13 Disconnect the wiring plug from the back of the lamp unit.
14 Unscrew the four securing nuts and withdraw the lamp unit from outside the cargo area. Recover the gasket.
15 Refitting is a reversal of removal, but ensure that the plastic washer between the wiring plug and the lamp unit is seated correctly, and make sure that the wiring protective sheath is seated correctly in the opening in the lamp cover.
See also:
Pistons/connecting rods - removal and refitting
Removal
1 Remove the sump, as described in Section
8, and the cylinder head, as described in
Section 7.
2 Check that the connecting rod and cap
have adjacent numbers at their big-end to
indicate ...
Engine coolant renewal (Every 36 000 miles (60 000 km) or 3 years)
Caution: Before proceeding,
note the precautions given in
Chapter 3, Section 1.
1 Disconnect the battery negative lead.
2 It is preferable to drain the cooling system
with the engine cold. If thi ...
Cold start valve - removal and refitting
Note: Refer to the precautions at the end of
Section 1 before proceeding.
K-Jetronic system
Removal
1 Disconnect the battery earth lead.
2 Detach the electrical wiring multi-plug from
the valve ...
