Radio aerial (exteriormounted) - removal and refitting
1 On models fitted with an electric aerial, disconnect the battery negative lead.
Saloon and Estate models 2 Remove the right-hand side trim panel from the luggage compartment.
3 Working outside the vehicle, unscrew the nut and remove the spacer and seal from the base of the aerial.
4 Working inside the luggage compartment, either unscrew the aerial bracket securing screw and slide the bracket from the aerial tube, or pull the base of the aerial from the rubber bush in the bracket, as applicable (see illustration).
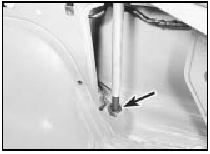
53.4 Pull the base of the aerial from the rubber bush (arrowed)
5 Ensure that the aerial is fully retracted, then pull it through the hole in the bodywork into the luggage compartment (see illustration).
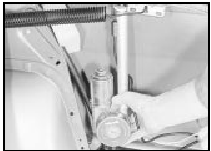
53.5 Removing an electric aerial - Saloon model
6 The aerial lead may be a push-fit in the base of the aerial, or may be secured by a knurled nut. Disconnect the aerial lead and where applicable, disconnect the wiring from the electric motor. Note that the aerial lead runs through the roof. If it is necessary to renew the lead, it may prove easier to leave the old lead in place and run a new one under the carpet. Follow existing wiring runs where possible.
7 Refitting is a reversal of removal.
Hatchback models
8 Remove the right-hand rear seat side
cushion.
9 Remove the rear parcel shelf.
10 On “high specification” models, lift the seat catch release lever, push out the pin securing the link rod to the lever and disconnect the link rod.
11 Remove the securing screws from the rear parcel shelf support (nine screws on models up to 1987, eight screws from 1987 onwards).
Remove the rear parcel shelf support.
12 Remove the side trim panel from the luggage compartment.
13 Proceed as described in paragraphs 3 to 7 inclusive.
P100 models
14 Pull off the plastic trim cover and unscrew
the aerial securing nut.
15 Withdraw the aerial assembly, and carefully prise the base seal from the roof panel.
16 The aerial lead runs across the roof panel under the headlining, and down the right-hand front pillar to the radio unit. Renewal is straightforward, but the front section of the headlining must be released for access and a length of string should be tied to the end of the aerial lead before removal to aid routing when refitting.
17 The aerial rod can be renewed by simply unscrewing it from the base.
18 Refitting is a reversal of removal.
See also:
Mixture (CO) adjustment potentiometer - removal and refitting
Removal
1 The potentiometer is located on the side of
the left-hand suspension turret (see
illustration).
17.1 Mixture (CO) adjustment potentiometer (arrowed) - 1.6 EFI engine
2 Disconnect the ...
Cigar lighter - removal and refitting
Removal
1 Disconnect the battery negative terminal.
2 On pre-1986 models remove the ashtray
then undo the screws and withdraw the
ashtray housing. On 1986 models onwards,
refer to Section 21 and ...
Tailboard (P100 models) - removal and refitting
Removal
1 Lower the tailboard to the open position.
2 Detach the rear lamp wiring cover on one
side of the vehicle by removing the two
securing screws (see illustration).
24.2 Rear lamp wiring ...
